
Set up receipts and donor emails for a migration
Updated 4 days ago
Prepare your program messages and receipts before importing records, then enable only the messages approved for launch. You can review saved wording while automatic sending remains off.
Who does this: your migration lead for self-onboarding; the assigned owner in your guided plan; Gratona for white-glove preparation. Your organization approves wording, administrator recipients and activation. See the onboarding paths and responsibilities.
1. Pause messages before importing
Three separate controls send donor email: automatic templates, the donor form and Journeys. Pause all three for the agreed migration scope, and no wider.
Automatic email templates
Open System Automations → Auto Email. Identify the email sets used by every program in the migration. Check whether a set is shared with a program already in use before changing it.
List what an agreed all-email pause covers: signup, account setup, profile updates, reminders, failed-payment messages, year-end statements, administrator notifications and custom templates.
For Donor Payment Receipt, include the standard receipt and every receipt variant. The list shows their individual Off states. Disabling a variant alone does not disable the standard fallback.
Open each template and set Send automatically to Off. Select Save, reopen it and confirm it remains off. In an older editor, the equivalent control is Disable Email.


A paused template: Send automatically is Off. Reopen the template after saving to confirm it stays that way.
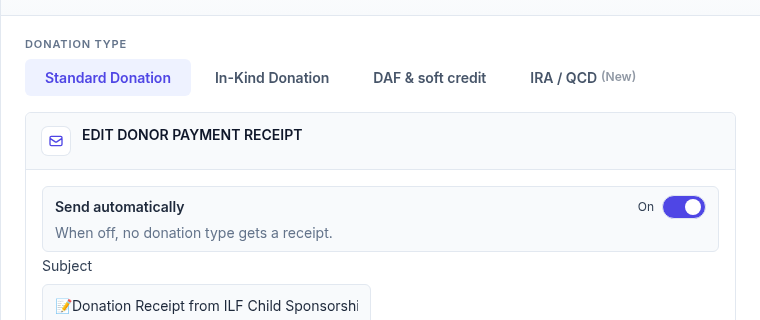

Receipt variants sit on their own tabs, and each variant carries its own Off state.
Donor form
Open Program Setup → Forms, choose Manage Form for the donor form, then Form settings.
Turn off Send form emails to donors and save. This is separate from Require email address; retain valid email addresses.
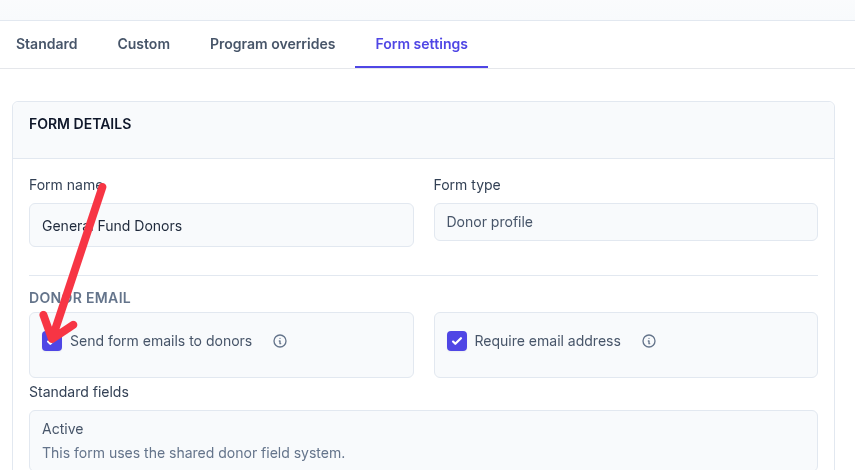

The two DONOR EMAIL controls are separate. The migration pause turns off Send form emails to donors only.
Journeys
Review Journeys separately. Keep new migration journeys in draft and pause existing workflows that would send to this imported group. Saving a message in the Message Library does not schedule or send it.
Check before proceeding: the relevant templates remain off after reopening, the donor-form sending control is off, and no Journey is set to send to the imported group. A setup warning, template count or saved message is not proof of sending status.
External commitments can still receive reminders. External Processor stops automatic charges, not all communications. Historical-backfill commitments have an additional non-charging hold that also excludes them from built-in payment reminders. Keep the relevant reminder templates and Journeys off while the original provider collects. The commitment editor’s impact notice shows whether a built-in reminder is expected with the current settings.
2. Attach the correct email set to each program
Create or review the set in System Automations → Auto Email. Use Create Auto Email Set when a program needs its own wording. Use the existing set where sharing is intentional.
Open Recipients and locate the program card. Use Manage or Finish setup to open program setup, then review the Emails step.
Select the intended program email set and use Attach selected templates when available. Reopen setup to verify the selected set. A Message Library draft is not a substitute for the program’s automatic email set.
Return to System Automations and check that all templates intended to remain paused are still off.
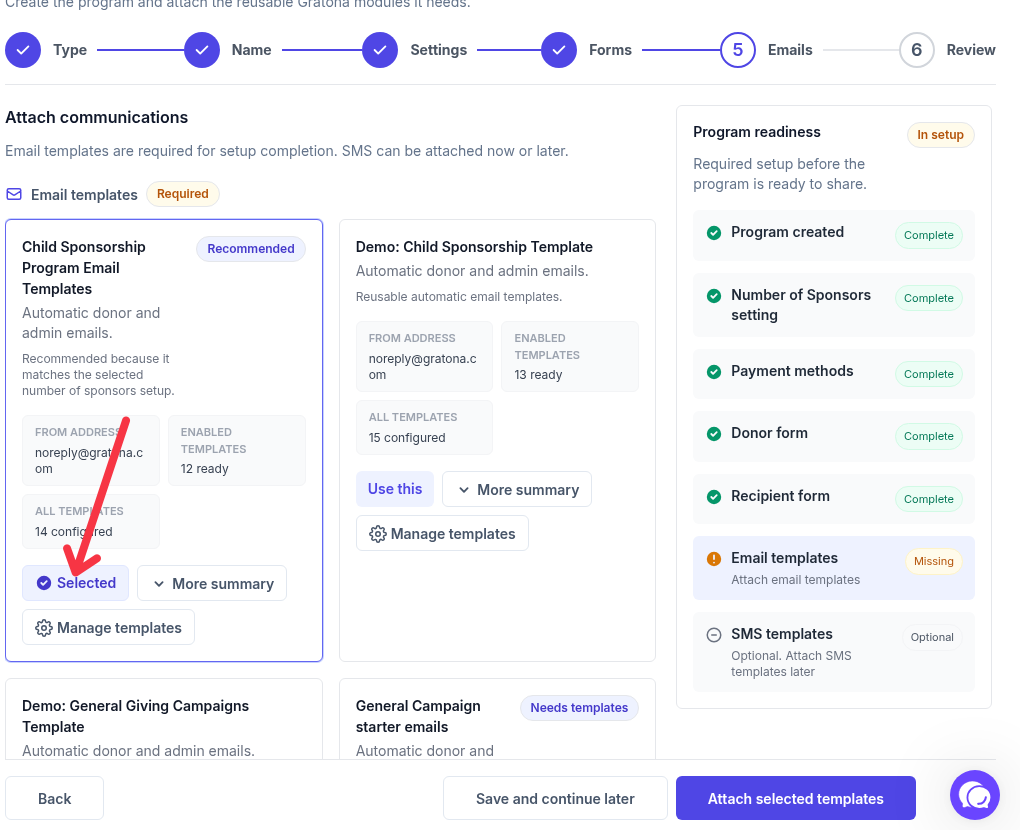

Select the program's email set under Email templates, then use Attach selected templates. Keep templates off while attachment is resolved.
If attachment is unavailable while every template is off: leave the sending controls off and ask Gratona to resolve the attachment, which Gratona checks before activation. Some accounts show a “Needs templates” warning even when the set contains saved templates. Turning live emails on to attach a set or to clear the warning is not a workaround to use. You can continue reviewing the saved wording while attachment is resolved.
3. Choose the receipt system
Keep receipts for payments collected by your previous provider with that provider until the agreed switch date.
Choose whether Gratona or Stripe sends payment receipts for the new collections. Review both systems so donors receive the intended messages.
Keep historical gift imports separate from new collections. Importing a record of an old gift should not send a new thank-you for it.
Record the decision and activation date in your migration record, along with the person approving the wording.
4. Configure combined receipts and reminder mode
Use this when one donor has several commitments charged on the same date with the same payment method. Preserve the donor’s existing dates rather than moving gifts to a different day just to combine them.
First, turn on combining in the program’s settings profile:
Open Program Setup → Program Settings and edit the setting profile used by the program. If only some programs should use these settings, clone the profile first and assign it to those programs.
In Sponsorship Options, enable Combine same-day charges.
Enable Combine email receipts. This option becomes available after same-day combining is enabled.
Save the profile.
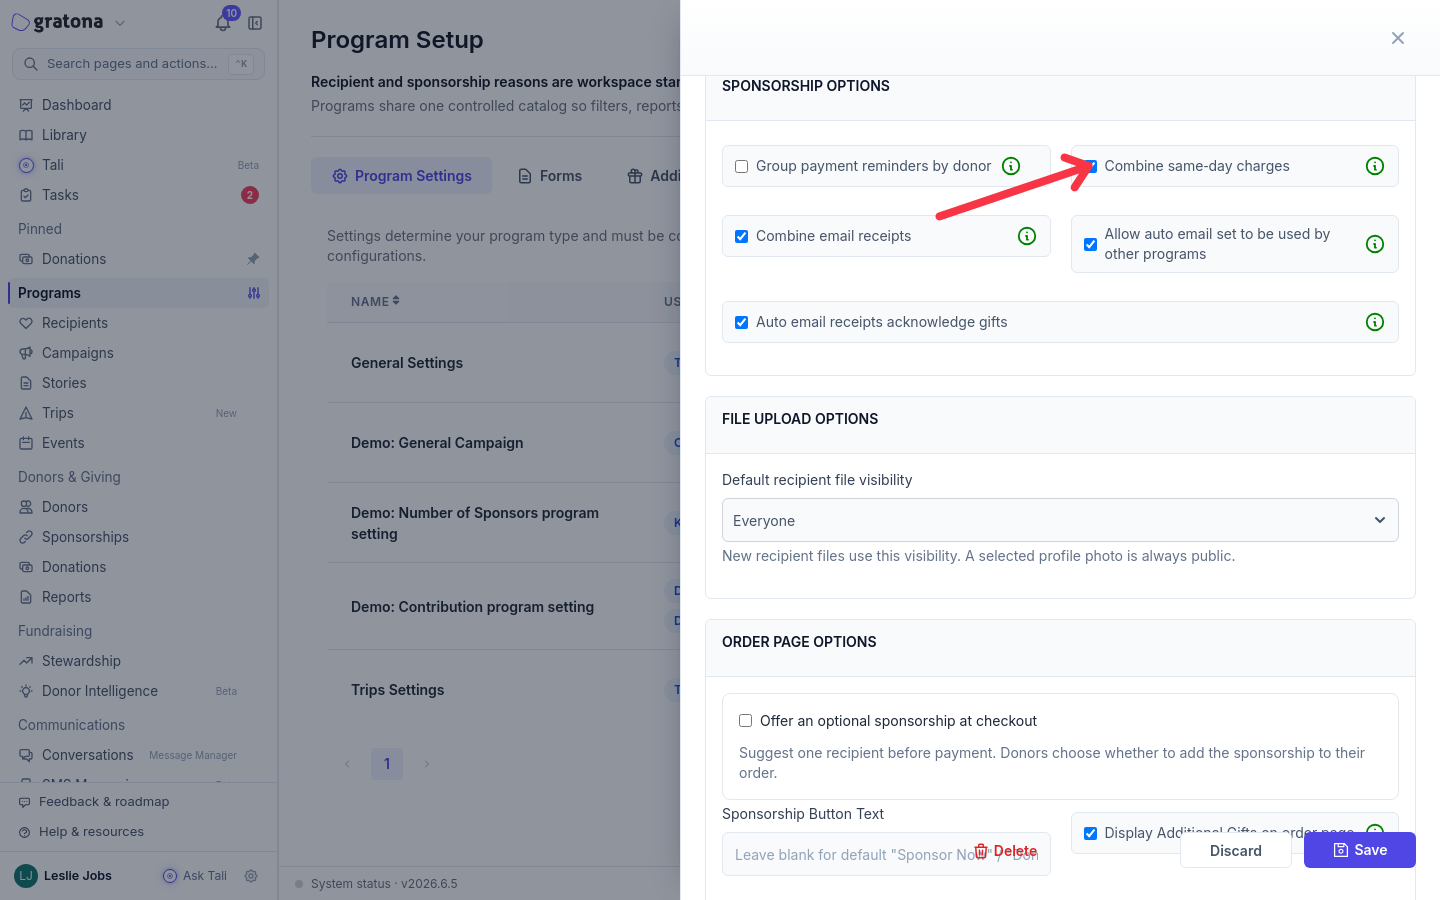

Both options are in Sponsorship Options. Combine email receipts becomes available once Combine same-day charges is enabled.
Then add the table to the receipt:
Open System Automations → Auto Email → Donor Payment Receipt → Standard Donation.
Include
[donations_table]in the body and save. Keep Send automatically off while preparation continues.
These settings control scheduled charges and their receipts. They do not combine gifts on different dates or payment methods. Adding the table shortcode alone does not change how many charges or emails are produced.
Match reminders to the program settings
In the same settings profile, check Group payment reminders by donor. Grouped reminders use [payment_reminders_table]. Individual reminders use the fields required by that template, including [designation_name], [amount], [frequency] and [method]. Follow the editor’s required-field messages; changing reminder mode may require updating its template.
The reminder table and [donations_table] serve different purposes. A receipt table does not configure reminders or change collection dates.
5. Review sender details and personalization
Open Organization settings → Email & sender. Review From Name, From Email Address and the sending-domain status. Also check any sender address configured on the email set.
Review each program’s welcome, update, reminder, receipt and failure messages. Supply the administrator addresses for the notifications you intend to use.
Open the template’s Personalization preview and message editor. Use the fields offered for that template and attached program. A recipient field available in one form may not exist in another.
Check the donor greeting, recipient first name, gift details, dates, links and blank-value behavior using representative records. Keep account-access wording consistent with the actual login flow, so no message promises a password or login link that the template cannot supply.
For example, a sponsorship welcome can use Thank you for supporting [en_first_name] as its subject when that recipient field is available. Keep receipt-specific amounts and tables in receipt templates. See Auto Emails and Custom Auto Emails for template behavior.
Birthday and Christmas wording can be prepared in the Message Library. For scheduling, open Journeys and check the triggers available in your account. If the required birthday or recurring-date trigger is unavailable, keep the message in draft and arrange the setup with Gratona. When available, check the audience, actual date field, timing and recurrence before activation. Historical age is not a birth date.
6. Agree the Stripe ACH notification timing
Stripe’s ACH mandate-confirmation email is separate from a donation receipt and from Gratona’s email templates, so none of the pauses above hold it. Importing ACH as PaymentMethod records with customer email addresses triggers these Stripe messages. Donors do not need to sign up again to receive them.
Settle the timing before the ACH import is approved, as part of the import review in Prepare payments for your migration:
Have Gratona and Stripe agree the supported import format and notification timing, using Stripe’s ACH import instructions for the current requirements.
Your authorized representative confirms the existing recurring-debit mandates and the bank-account validation required by Stripe.
If no donor emails may go out yet, keep import execution on hold until Stripe confirms the agreed handling.
Keep valid donor email addresses in the records. Legacy import options are not available in every workflow, so they are not an assumed way to suppress messages.
7. Test, approve and enable
Personalization preview shows the rendered message without sending, so use it for review. An administrator test send does not establish that background sending is paused, and live sending stays off until launch approval.
Use Personalization preview on each template to check the rendered result without sending. If a live test send is required while live sending must remain paused, arrange a separate isolated test program or workspace with Gratona rather than enabling the live templates.
Check sender, subject, donor and recipient names, amounts, dates, links and table contents. Test each distinct program or reminder configuration.
Keep Send automatically off until launch approval, and leave the donor-form and Journey holds in place.
At launch, enable only the approved templates and applicable form/Journey controls. Approve Stripe ACH notifications separately. Check the first actual collection and its receipt for the intended charge and email grouping.
Record the approver, activation date, intended messages, administrator addresses and first-receipt result in your migration record. Keep wording feedback there and edit the actual templates in Gratona.