
Recipients Table
Updated 3 days ago
Recipients Table
Use the Recipients table when you need to review the people or records in a sponsorship program, check sponsorship status, update recipient details, change the table view, export recipient data, or work with records in bulk.
Start from Recipients in the sidebar. The first page shows the recipient programs your role can access. Choose the program you want to work on, then select Open. Some older or list-style views may call this action View Recipients.
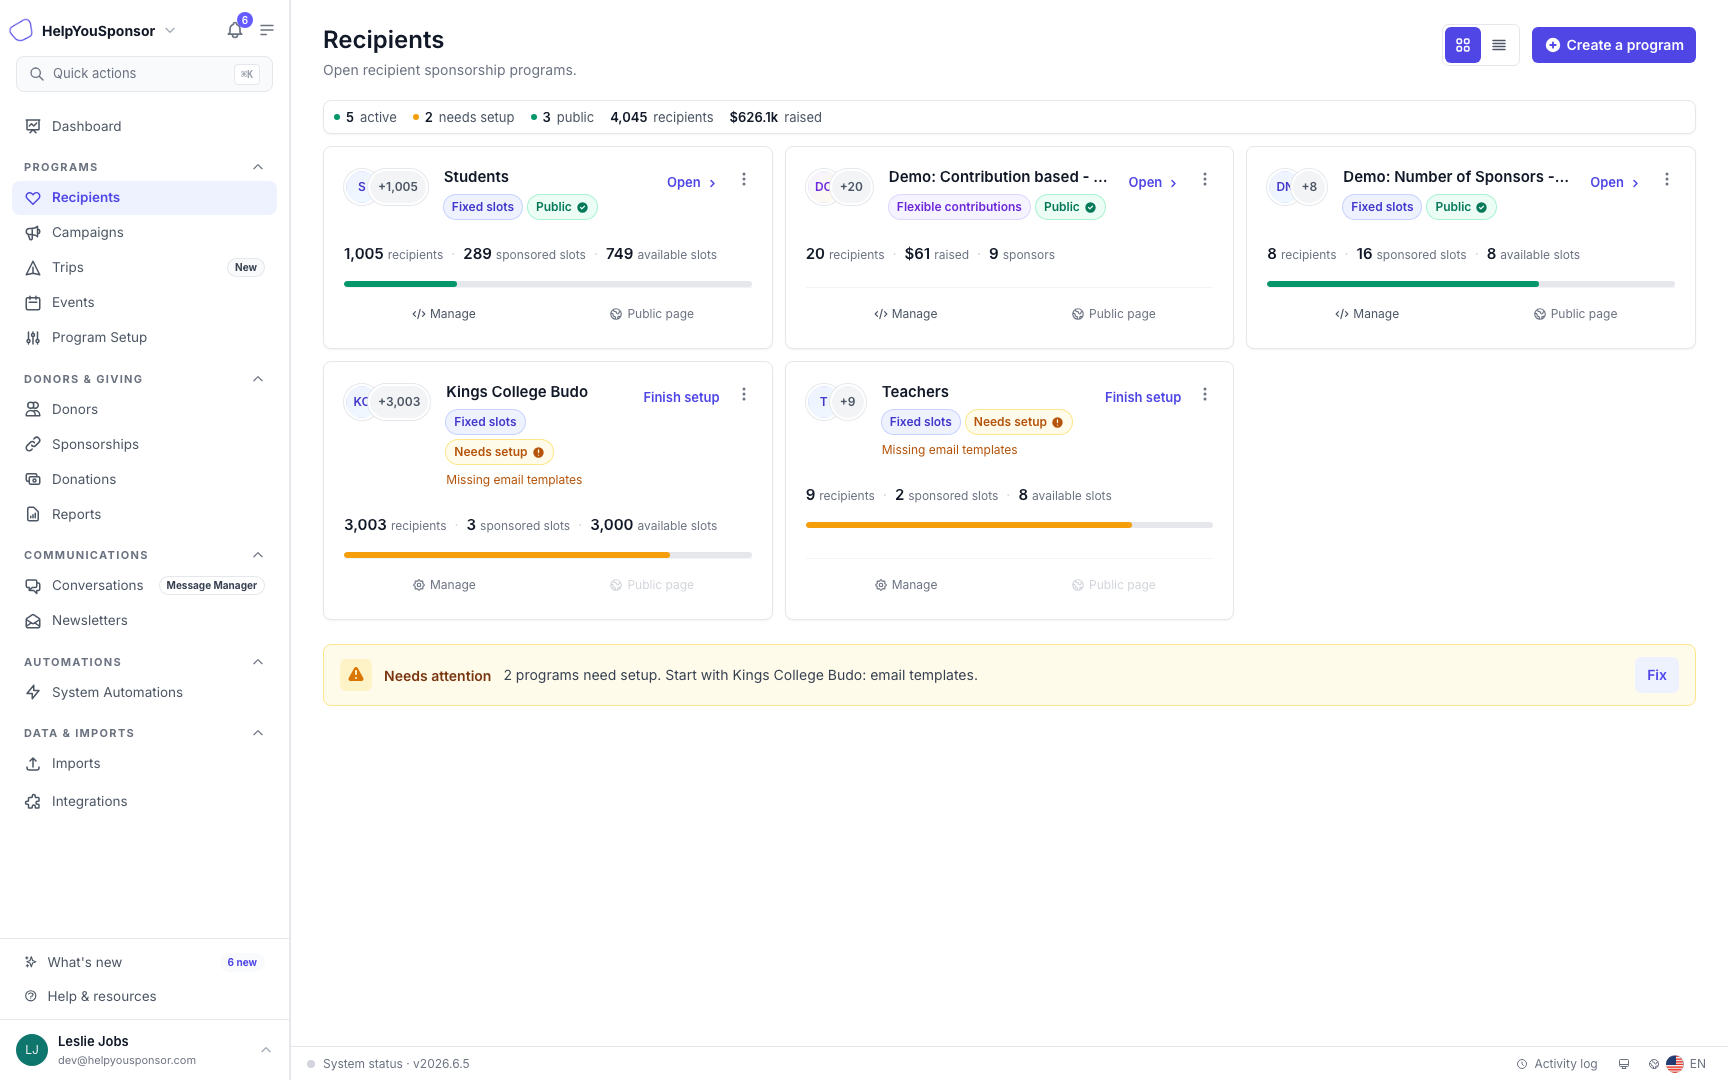
The Recipients overview helps you choose the program whose recipient records you want to manage.
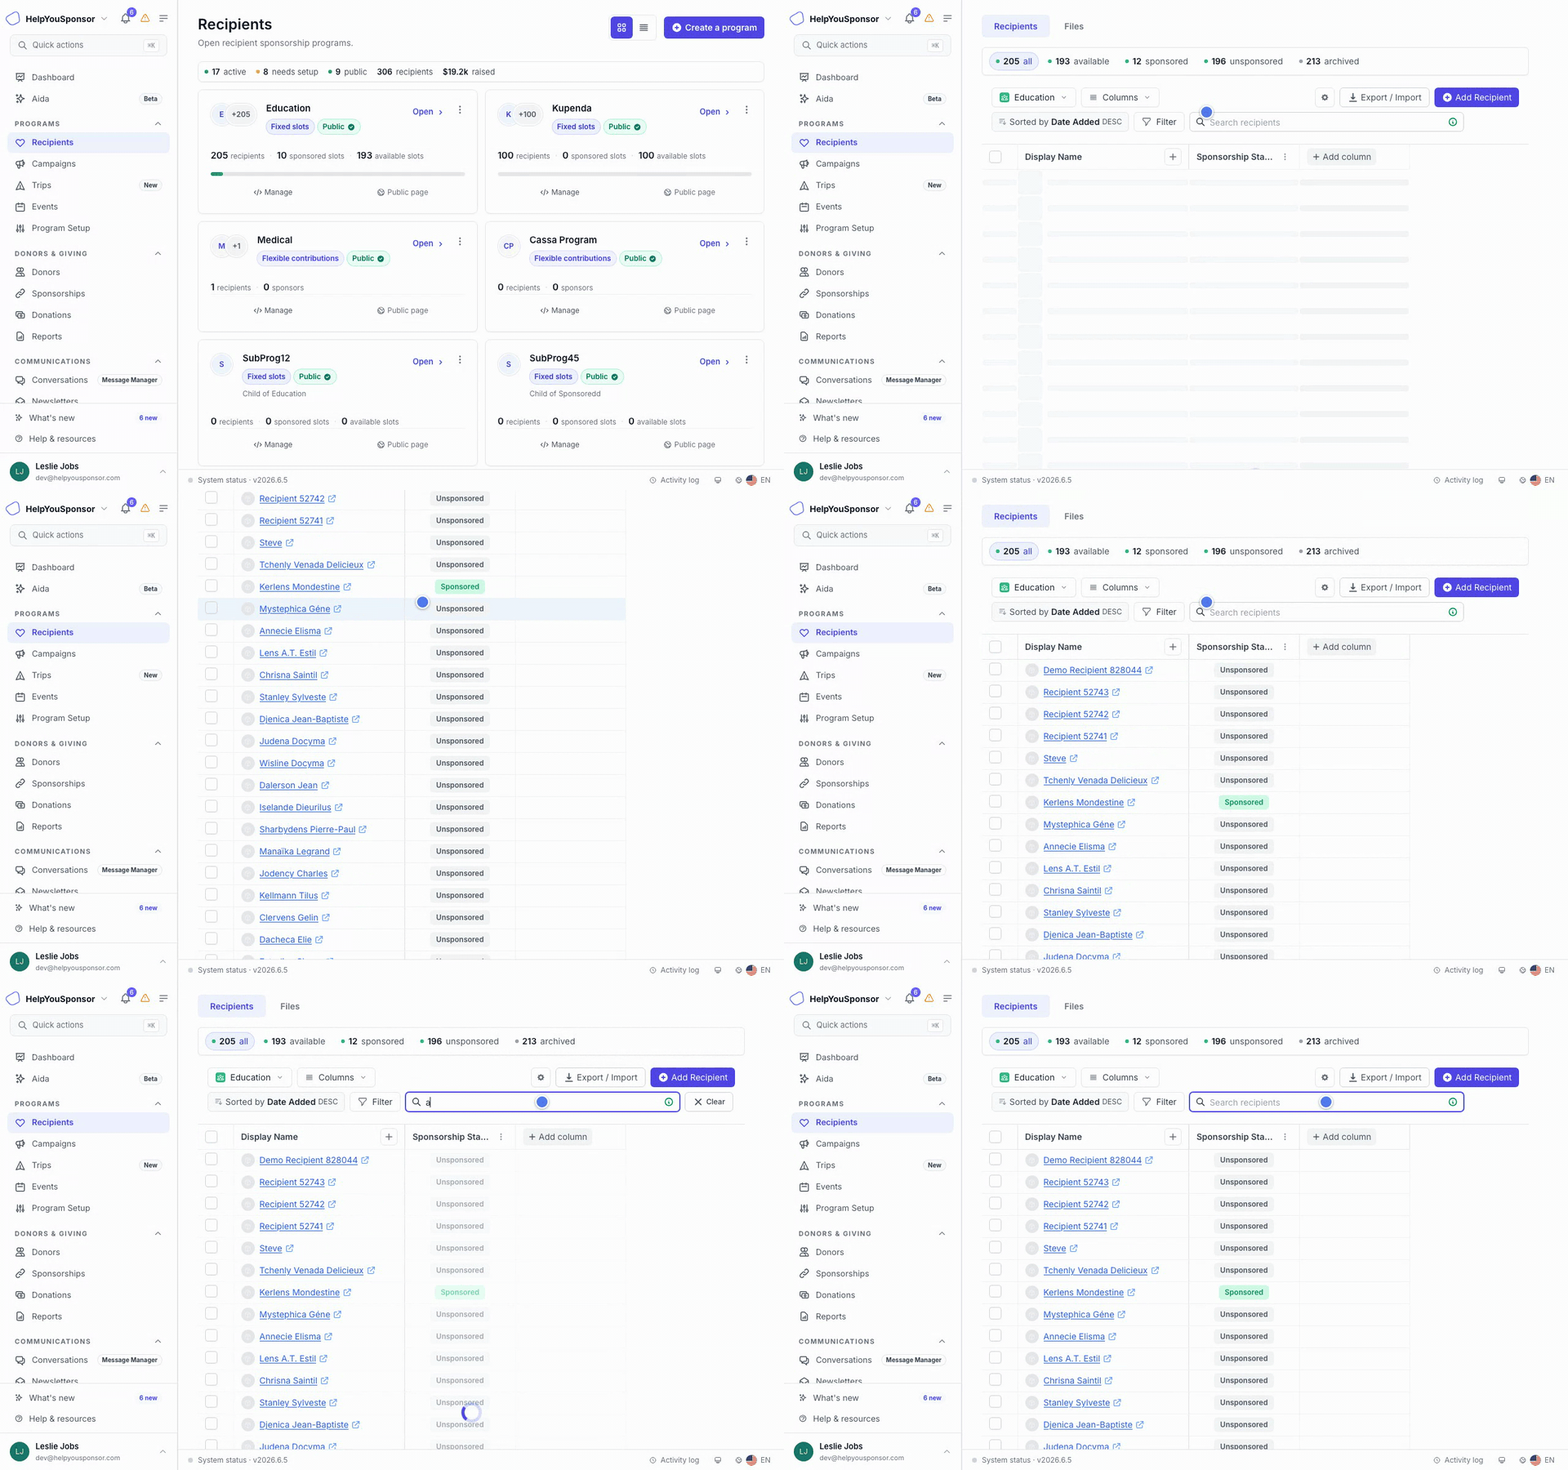
Walkthrough: opening a program and reviewing its recipients.
Choose the Program You Want to Work On
Each program card shows the program name, setup status, public page status, and recipient or slot counts. Use this overview when you are trying to answer, "Which program's recipients do I need to manage?"
Program cards can include:
Open to work with the recipients in that program.
Manage to update program setup when your role allows it.
Public page to review the donor-facing program page.
Finish setup when a program still needs required setup steps before recipient work is ready.
The overview may also show a list view toggle, a Create a program button, and an attention message for programs that need setup.
Read the Recipients Table
Each row represents one recipient in the selected program. The table columns come from the recipient form and from system fields such as sponsorship status, recipient ID, tags, dates, and sponsorship counts.
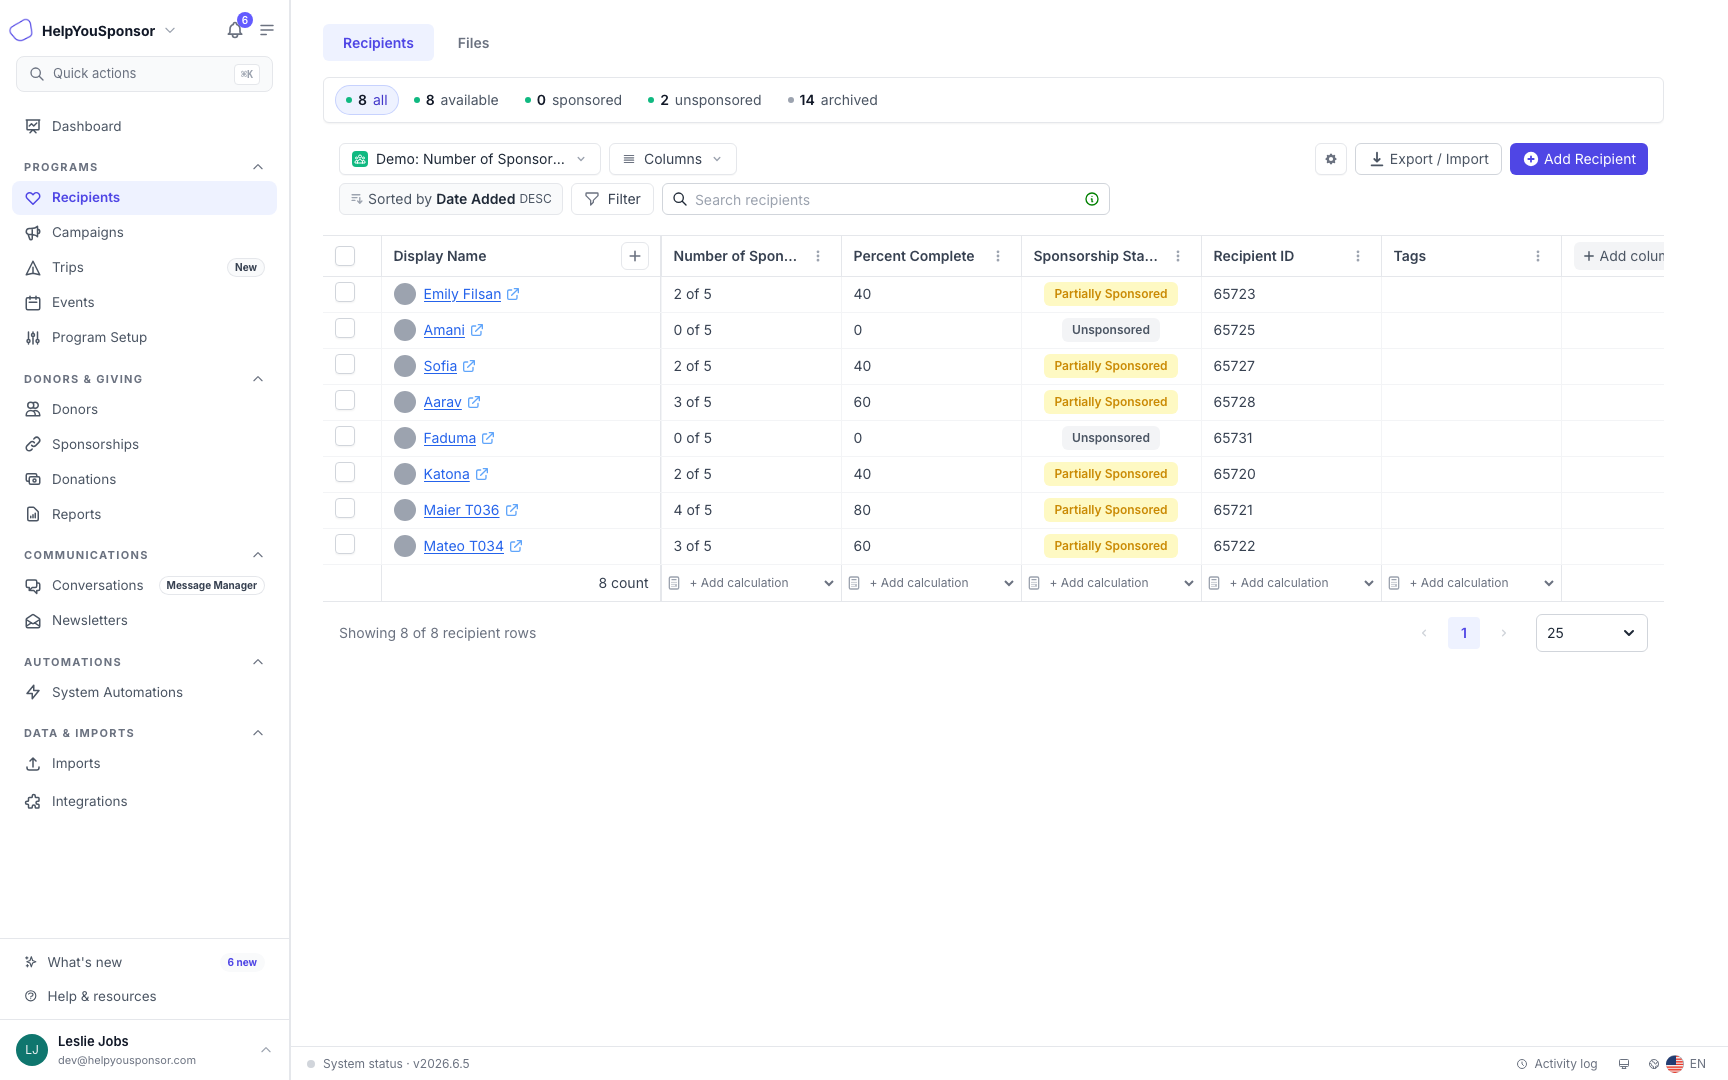
The Recipients table shows recipient records, sponsorship status, and program-specific fields in one worksheet-style view.
Use the table to:
review recipient names and key program fields
sort records by supported column headers
open a recipient record from the name or row action
change page size or move through pages when the program has more records
add columns that help answer the question you are working on
The table may look like a newer worksheet or a classic table depending on your account settings. The same recipient records are used in both experiences.
Review Sponsorship Status
Use the status counts above the table when you need to narrow the records by sponsorship state.
All shows the program's visible recipient set.
Available shows recipients available for sponsorship.
Sponsored shows recipients with active sponsorship coverage.
Unsponsored shows recipients without current sponsorship coverage.
Archived shows recipients that have been archived.
Selecting a status count updates the table. If you are using filters or a saved view, the table keeps that context where the current view supports it.
Search and Filter Recipients
Use Search recipients when you need to quickly find a recipient by visible or searchable fields in the current table view.
Use Filter when you need a more specific list, such as recipients with a certain status, tag, field value, blank field, or date-based condition.
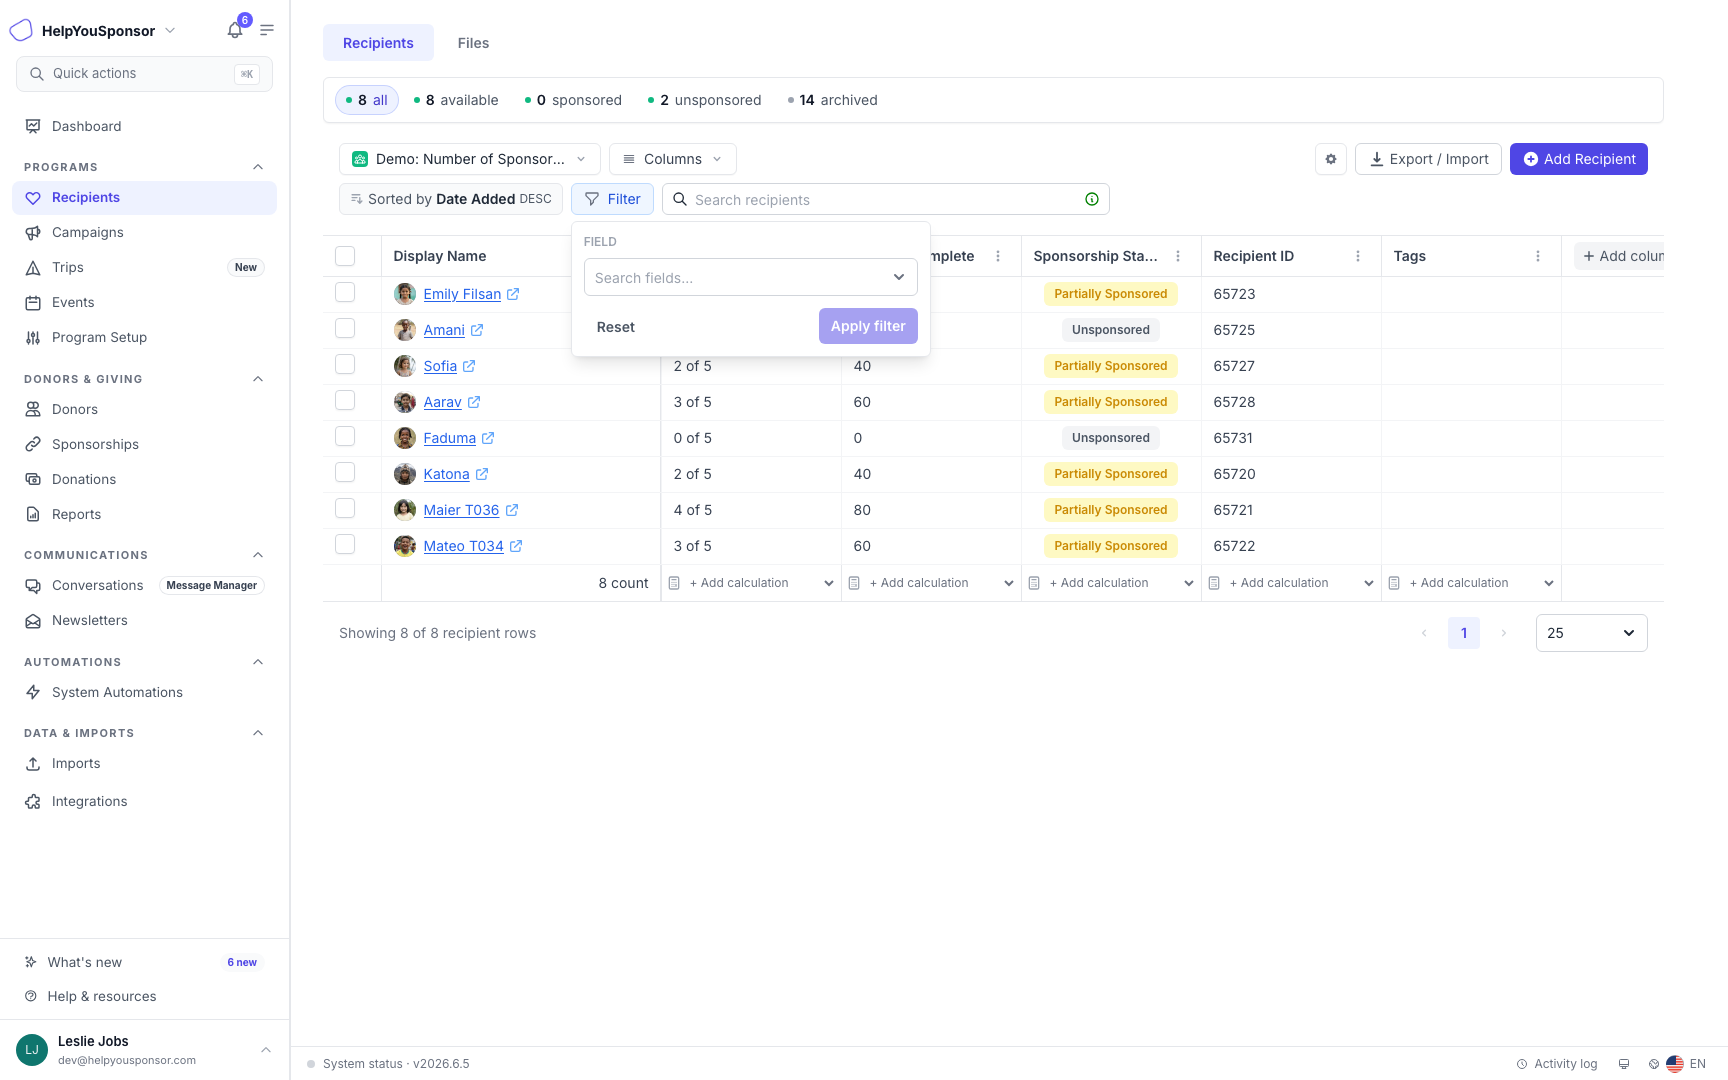
Filters help you narrow a recipient program by field, comparison, and value.
To filter recipients:
Select Filter.
Choose the field you want to use.
Choose the comparison when the filter asks for one.
Enter or select the value.
Apply the filter.
Active filters affect the table, exports, and saved views when those tools are available in your account.
Save Views and Choose Columns
Use Columns when you want the table to show the fields that matter for your current task without changing the recipient form itself.
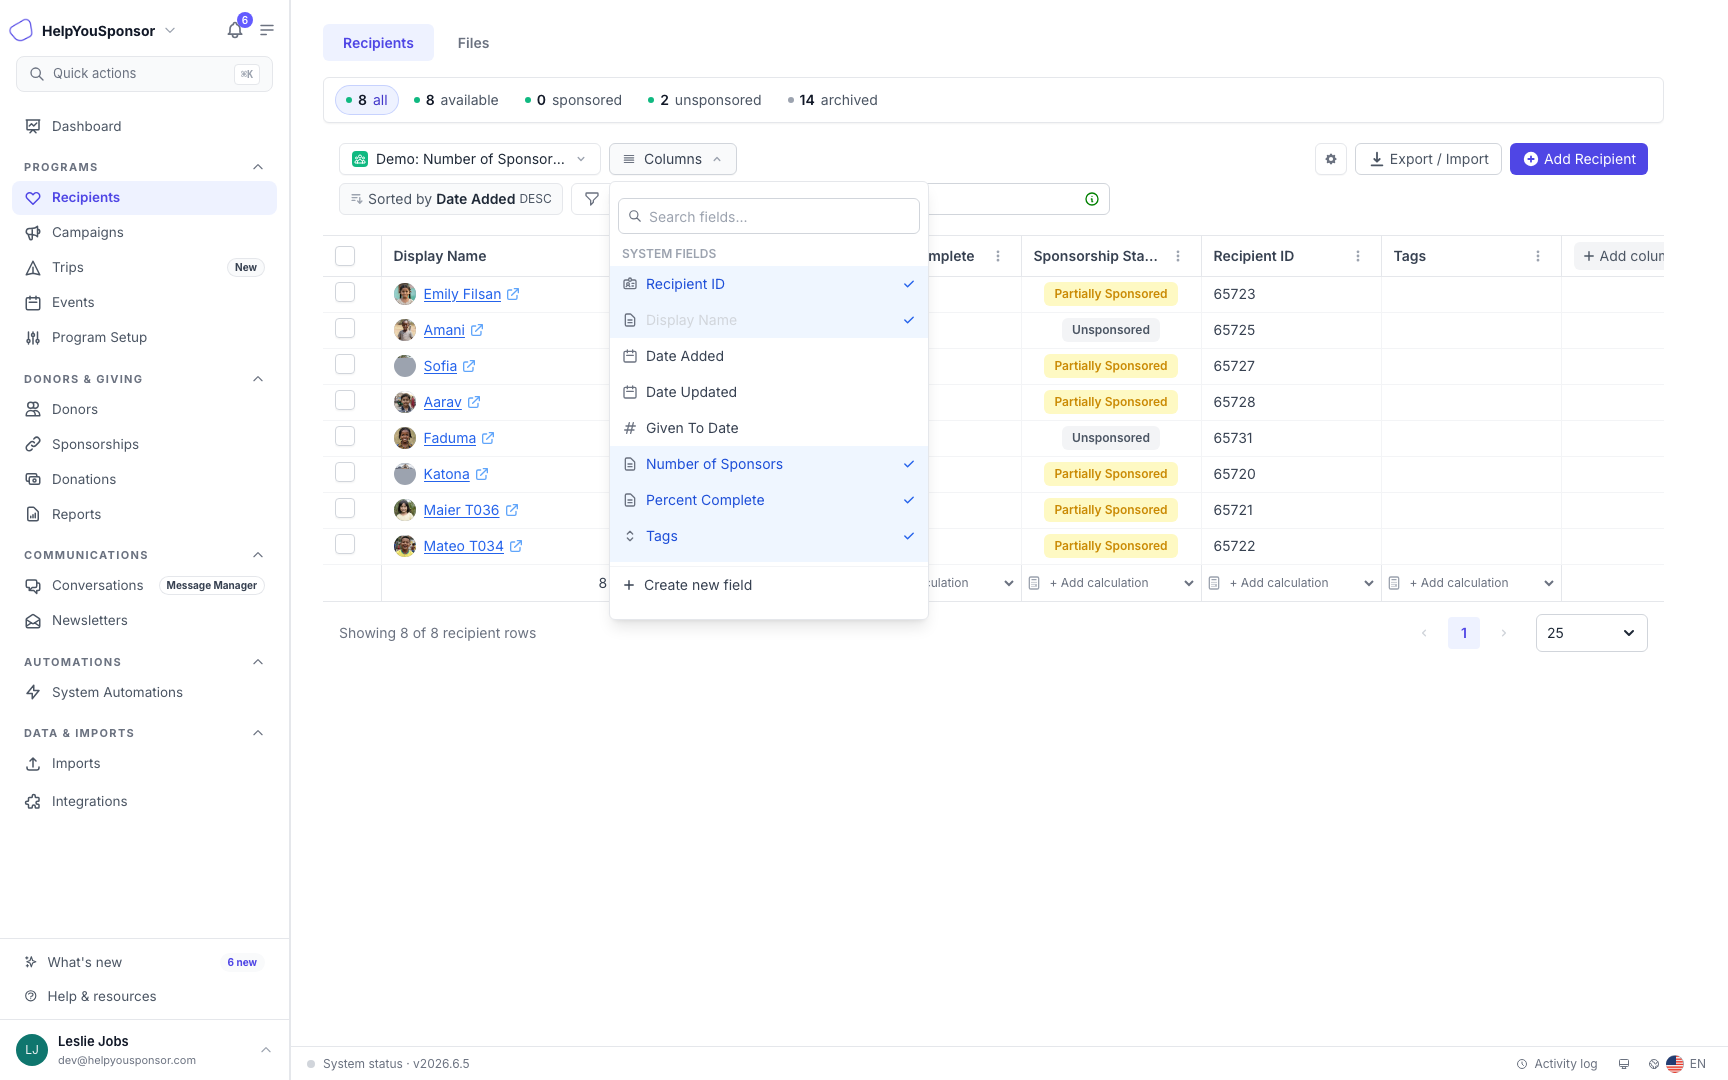
The Columns menu controls which recipient and system fields appear in the table.
You can add or hide columns, and some worksheet views let you reorder columns directly from the table header. If you see a program or saved-view selector, use it to switch between programs, archived recipients, and saved recipient views.
Save a view when you want to reuse a combination of:
visible columns
column order
sorting
filters
the selected program context
Use Manage Form only when you need to change the fields your team collects for recipients. Managing the form changes the data structure for the program; choosing columns only changes the table view.
Export or Import Recipients
Use Export / Import when you need a CSV of recipient records for reporting, sponsorship management, or offline analysis.
Confirm the active program, view, columns, search, and filters.
Select Export / Import and choose your option:
Current page CSV — downloads the rows currently shown on the page.
All as CSV — starts a background export of all recipients matching the current view.
All sent to email — starts a background export and emails a download link when ready.
Exports follow the current program, search, filters, sorting, and selected columns. Large exports are prepared in the background. A progress section appears at the top of the page while processing and provides the download when ready.
Imports are available when your role and the active program support recipient import. The import flow provides recipient CSV templates and samples before you continue into mapping and review.
Add or Update Recipients
Use Add Recipient when you need to create a new recipient in the selected program. The fields in the add form come from that program's recipient form. See Add Recipient for the full add-recipient workflow.
Open an existing recipient when you need to update profile details, manage files, review activity, or work on tasks connected to that recipient.
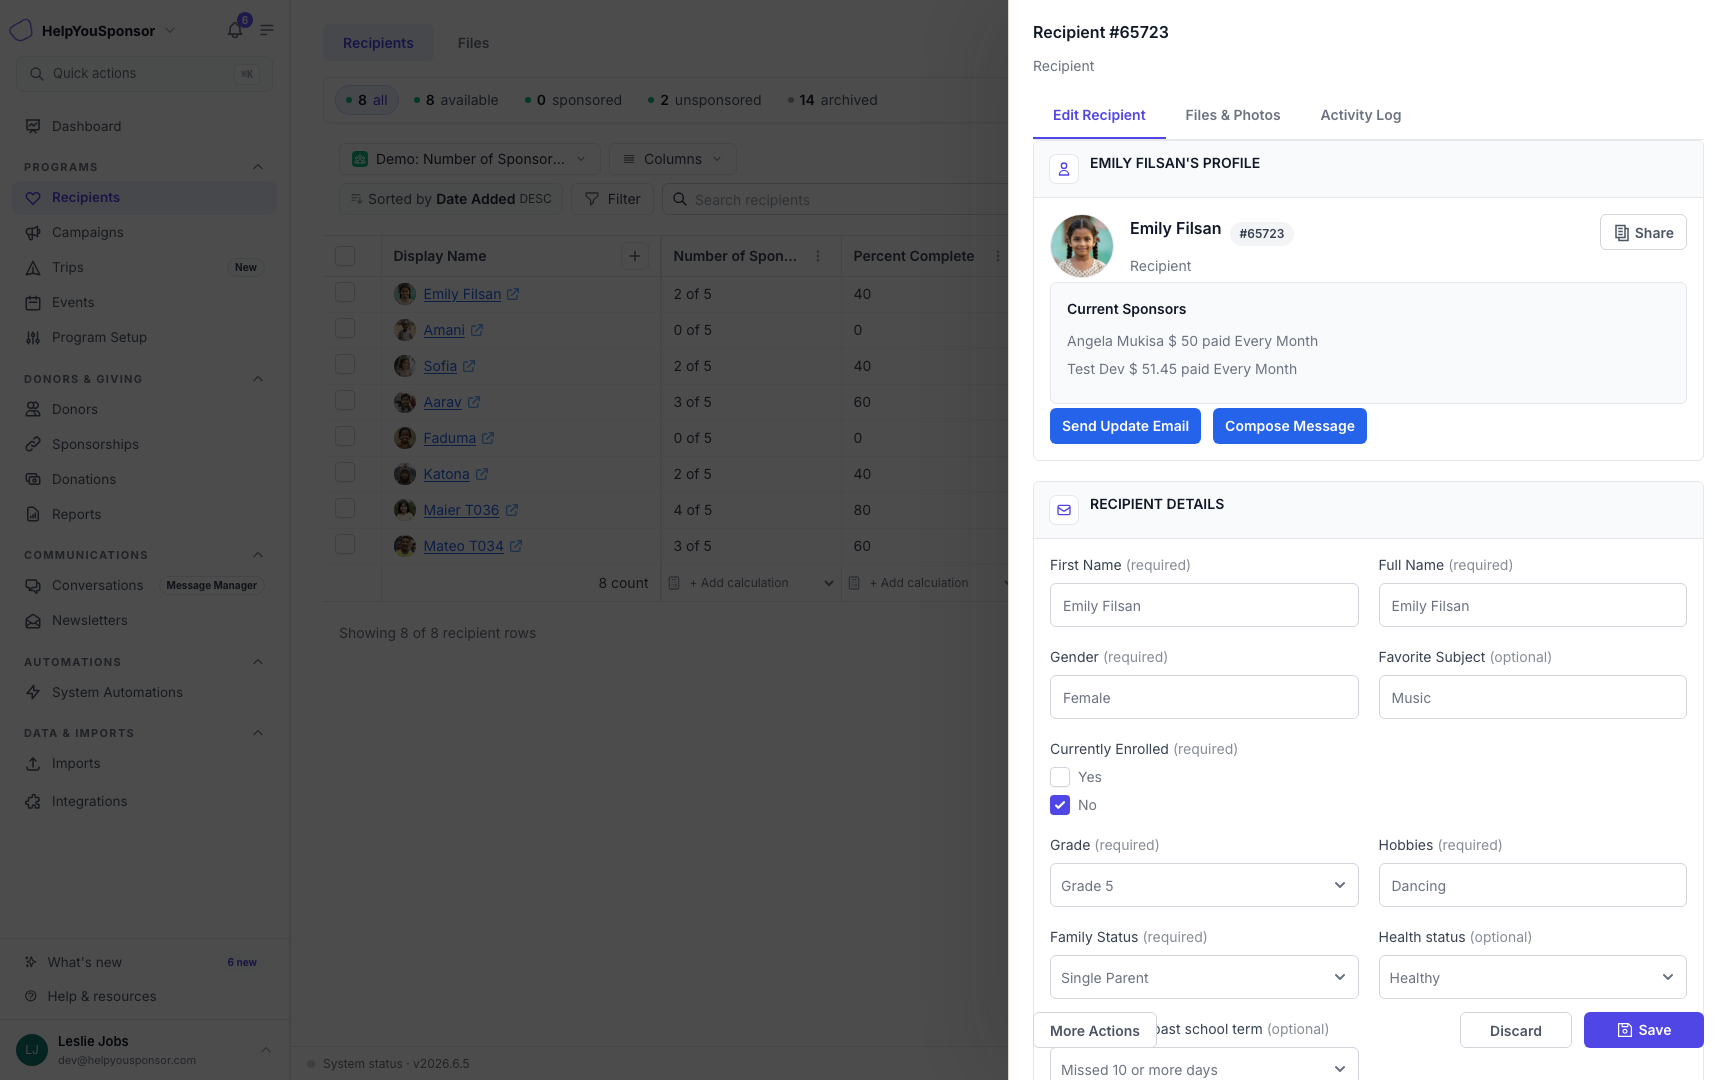
The recipient drawer lets you edit recipient details and access related tabs such as files and activity.
Depending on your permissions and enabled features, the recipient drawer can include:
Edit Recipient for profile and program fields
Files & Photos for recipient images and uploads
Activity Log for recipient-related activity history
Tasks for task work connected to the recipient
More Actions for notes, moving the recipient, archiving, restoring, or deleting
Report when archived form/report history is available
The edit form can also include recipient visibility options, such as hiding the recipient from the sponsorship page, and featured-recipient options when the program supports them.
Work With Selected Recipients
Select recipients when you need to take action on more than one record. Depending on your permissions, selected-recipient actions can include:
bulk editing recipient fields
moving recipients to another compatible program
archiving recipients
syncing selected recipients to QuickBooks when the integration is enabled
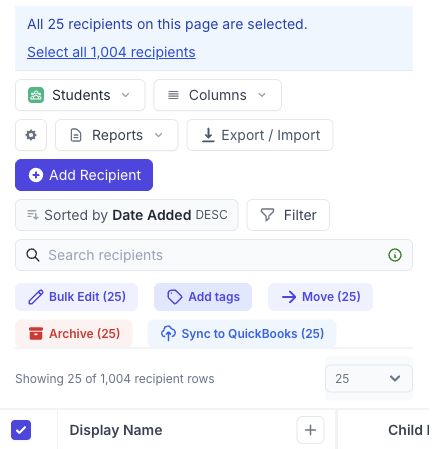
When you select all recipients on the current page, Gratona may offer a second option to select all matching recipients in the current view. A bulk edit on all matching recipients applies to the full matching set across every page of the current view, not just the first page. Review the selected count before running a bulk action.
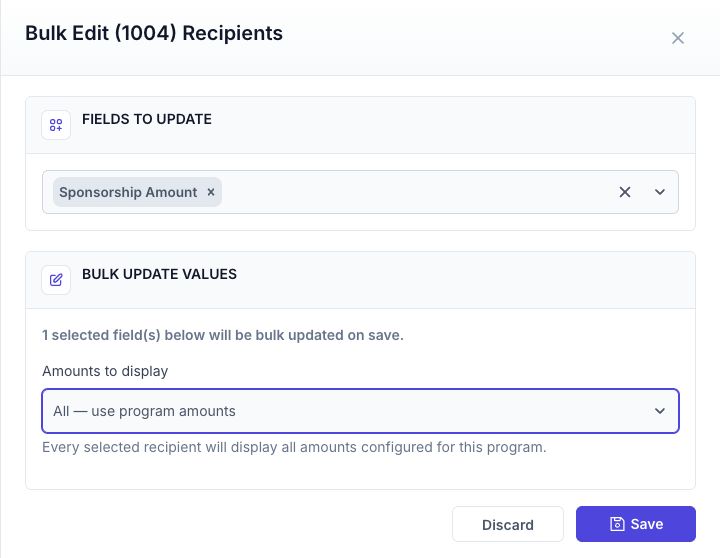
For number-based programs, the Bulk Edit drawer includes an All — use program amounts option for the Sponsorship Amount field. Choosing it clears each selected recipient's individual amount override so every selected recipient uses the program's configured amounts. The fixed amount choices remain available when you want to set one amount for all selected recipients instead. If you bulk edit a different field without changing the amount, an existing recipient amount override is preserved.
Bulk edit sponsorship amounts for a grade or group
Use this workflow in a number-based (fixed-slot) program to apply one amount to a grade or group, or let donors choose from every amount configured for that program.
Open Recipients, choose the program, and select Open recipients.
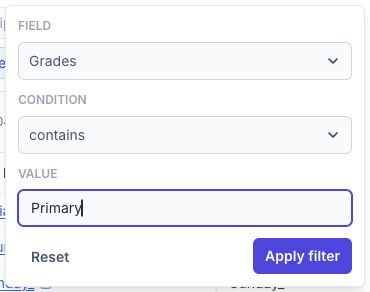
Select Filter and narrow the list by the field your program uses for the group, such as Grades. Review the matching recipients.
Select the recipients using the row checkboxes. To update the whole filtered group, select the checkbox at the top of the table, then choose Select all [count] recipients if the group spans several pages. Confirm the selected count.
Select Bulk Edit ([count]). Under Fields to update, choose Sponsorship Amount.
Under Amounts to display, choose a fixed amount for everyone selected, or choose All — use program amounts to display every configured program amount. If a fixed amount is missing, add it under Sponsorship Amount(s) in Program Settings, save the settings, then reopen Bulk Edit.
Select Save and wait for the bulk edit to finish. Review the completion message and updated count before starting another bulk edit. Open a recipient to confirm the saved value; use the program’s Public page to check the choices donors see.
Example: If your program offers €30, €40, and €50, filter the Primary group and set €30, then repeat for Junior at €40 and Senior at €50. Choose All — use program amounts for any group whose donors should be able to choose among all three program amounts.
These settings control the amount choices shown for recipients. They do not change an existing sponsorship’s recurring payment amount; manage existing sponsorships separately.
Screenshots of the workflow
Review Archived Recipients
Use Archived when you need to review recipients that are no longer active in the main table. Archived recipients can be restored when your role allows it. Permanent delete actions may also be available for archived recipients, so use delete only when your organization is ready to remove those records.
Archiving a recipient can affect sponsorship relationships and recurring payments, so review the confirmation message before completing the action.
Archive or permanently delete a recipient or designation
Use the same process for a person or for a campaign designation such as a fund, project, or giving option. The permanent Delete action appears only after the record has been archived.
From Recipients, choose the program or campaign that contains the record, then select Open.
Search for and open the recipient or designation.
Choose More Actions > Archive, review the warning, and confirm.
Switch the table to Archived.
Open the archived record, choose More Actions > Delete, and confirm the permanent removal.
If the record has active sponsorships, commitments, recurring payments, or gift history, review those relationships before deleting it. Keep the record archived when your organization needs to preserve its history. Your role may also restrict archive or delete actions.
QuickBooks-linked records
Removing a record from Gratona does not always remove its linked QuickBooks item. When Delete in QuickBooks when deleted in Gratona is enabled for outbound synchronization, Gratona deactivates the item in QuickBooks instead of hard-deleting it. If that setting is off, deactivate the item manually in QuickBooks when appropriate. Existing QuickBooks financial history is not rewritten.
Use the Files Tab
When you are working inside a specific program, the page can include a Files tab next to Recipients. Use it when you need to review uploaded files connected to recipients in that program.
See File Management and Deleted File History for the file workflow.
Permissions
Your role controls what you can see and do on the Recipients table. You may not see every action described here. Program access, add recipient, manage form, manage program, import, export, bulk edit, move, archive, restore, delete, reports, activity logs, tasks, and integrations can all be permission-gated.