
Check that Allow users to sort on front page is checked in Front Page Options.
Check that the recipient form attached to the program has an Age or Grade field. If it does not, add one in the form editor.
Check that the field has Sortable? checked and is visible to Everyone.
If the listing combines several programs, the field must be public and sortable on every form involved.
Website & Embed
Updated 7 days ago
Website & Embed is the workspace where you share a program's public page, copy donor links and embed code, and control what donors see. Open it from Programs > Recipients by selecting Manage on a program card.
Website & Embed
The workspace is available for recipient sponsorship programs, campaigns, and other program types that have a public donor-facing page. You may also see Website & Embed inside the Manage Program drawer or after completing program setup.
Go to Programs > Recipients in the main menu.
Find the program card and select Manage. If the program is not fully configured yet, Manage or Setup resumes the setup flow instead.
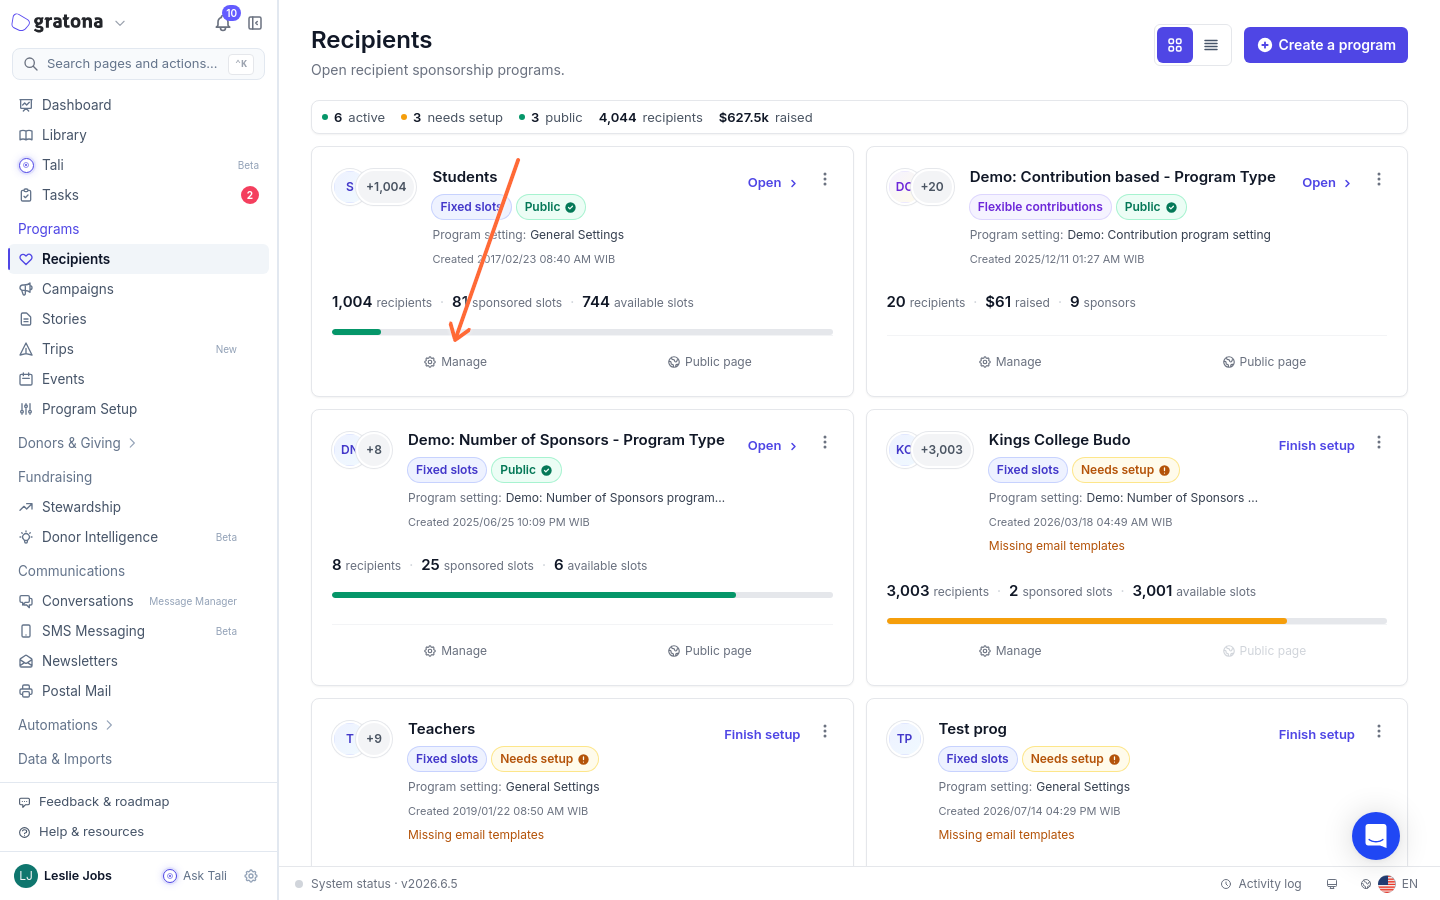
Select Manage on a program card to open Website & Embed.
Share a program with donors
Open the program you want to share.
Select Manage to open the Website & Embed workspace.
Review the Readiness section. If the program is ready, Gratona shows it as ready to share. If something is missing, the readiness list shows what needs attention before you share the page.
Use Preview to open the public page in a new browser tab.
Use Copy link to copy the main public page link.
For recipient sponsorship programs, the public links can include:
Infinite Scrolling: the full recipient list.
Pagination: a paginated recipient list.
External Data Entry: a public form for adding records.
Random Single Recipient: a link that sends donors to one available recipient.
For campaign-style programs, the workspace shows the campaign donation page or fundraising page links instead.
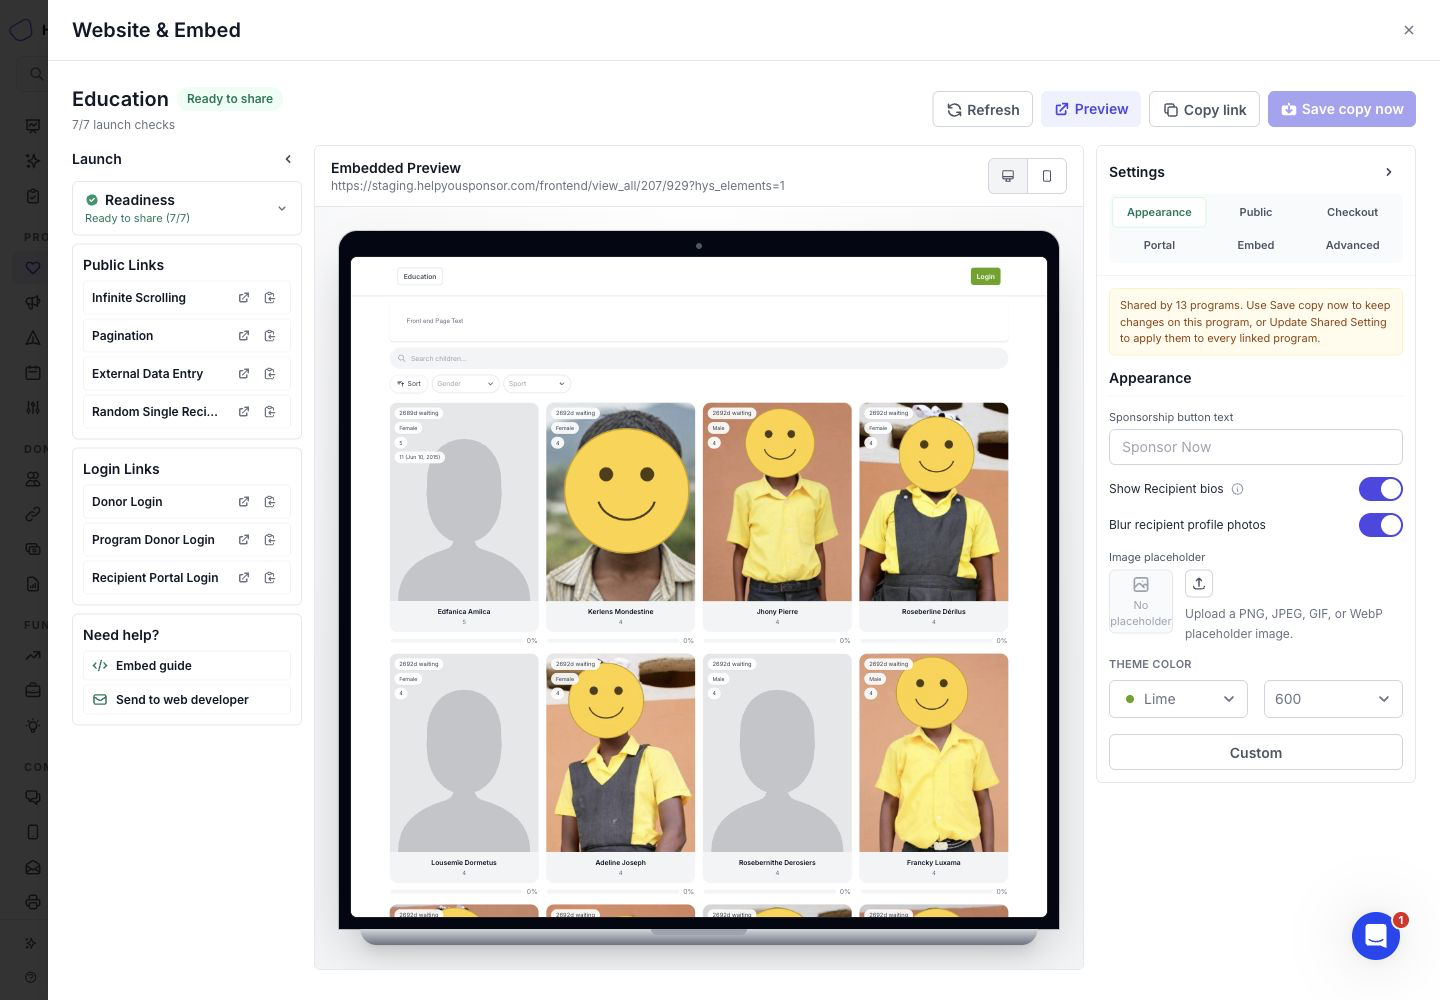
The Website & Embed workspace shows readiness, public links, login links, an embedded preview, and launch settings.
Send links to donors or recipients
Use Public Links for pages donors can visit directly.
Use Login Links when you want to send someone to a portal:
Donor Login: the general donor login page for your organization.
Program Donor Login: the donor login page scoped to this program.
Recipient Portal Login: the recipient-facing login page, when the recipient portal is enabled for the program.
Each link has an open action and a copy action, so you can check the page before sharing it.
Turn the donor login button on or off
The Donor login on checkout toggle in the Portal section of the settings panel controls whether unauthenticated donors see a Login button on the program's public pages.
When the toggle is on, the Login button appears on the checkout page, the recipient listing, and recipient profiles, including when those pages are embedded in your website with Smart Embed. When it is off, the Login button is hidden on those pages.
The built-in donor login page is program scoped: open it with Program Donor Login and it uses that program's theme. The general Donor Login link uses organization-level branding, as described under Change the theme color.
Add the program to your website
Use Smart Embed when you want the program to appear inside your organization website. Smart Embed uses a short code snippet and resizes automatically as donors move through the public page.
Open the Embed section in the Website & Embed settings panel.
Choose any available embed defaults, such as a paginated recipient list for sponsorship programs or campaign defaults for campaign programs.
Copy the code under Paste into your website.
Send the code to the person who manages your website, or paste it into the page where the donor experience should appear.
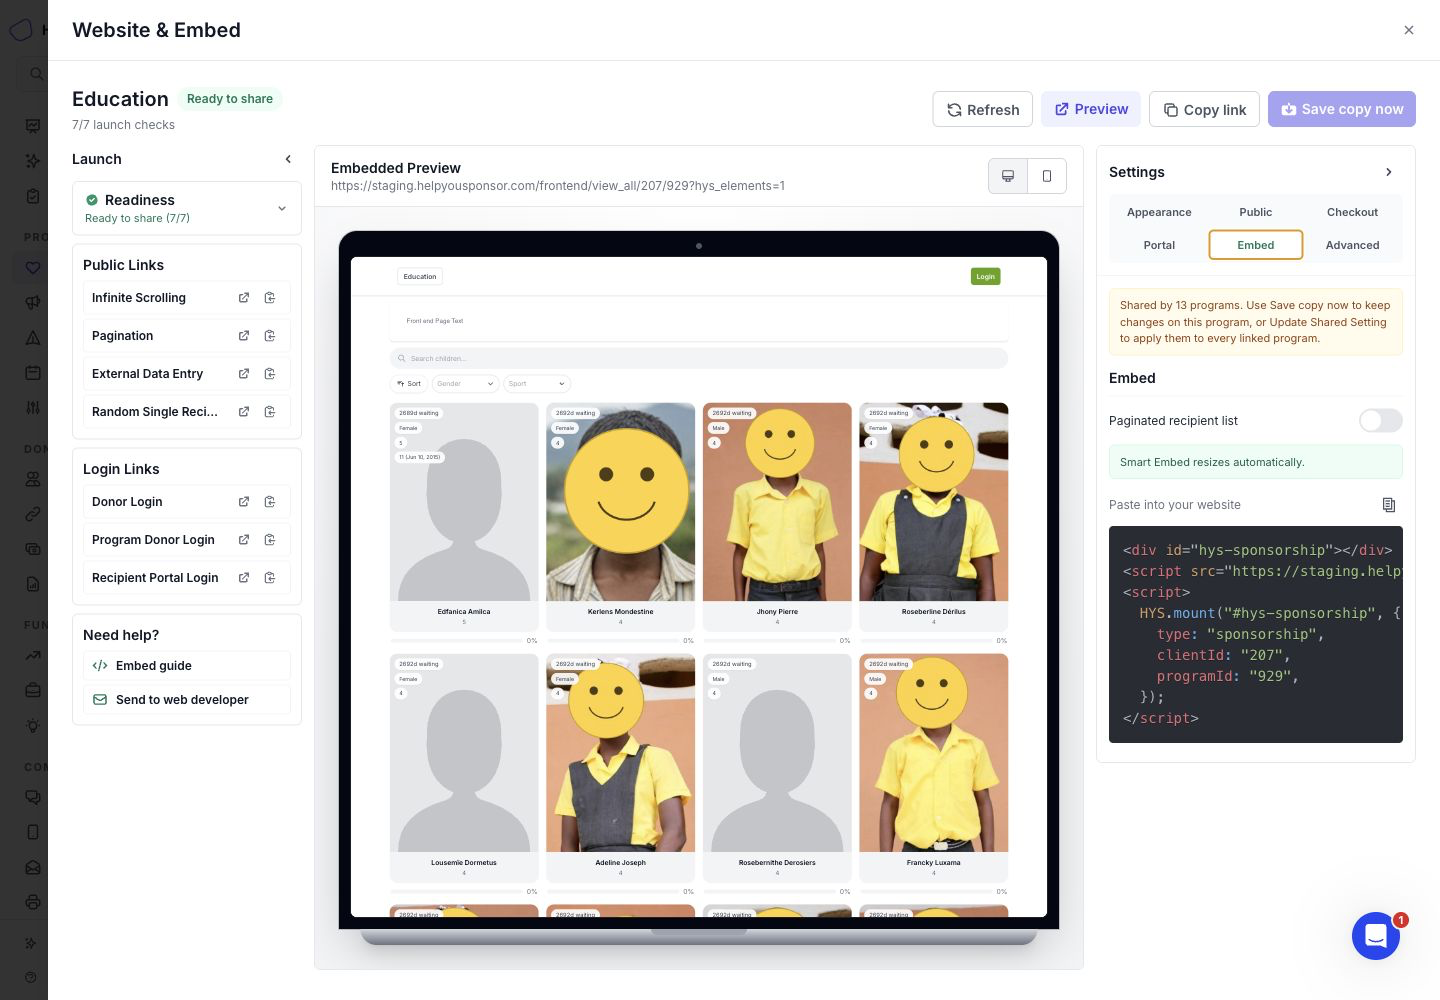
The Embed section provides the Smart Embed code for your website.
The Need help? section can also copy a developer handoff message that includes the program name, public page link, and Smart Embed code.
Note: Smart Embed is the recommended website option for programs. The Website & Embed workspace does not provide a separate fixed-height iframe option.
Choose recipient columns by screen size
Use Directory layout to choose the maximum number of recipient cards in each row of a sponsorship Smart Embed. You can use different layouts on mobile, tablet, and desktop. These controls work with both scrolling and paginated recipient lists; they do not apply to campaign donation pages, peer-to-peer pages, or trips.
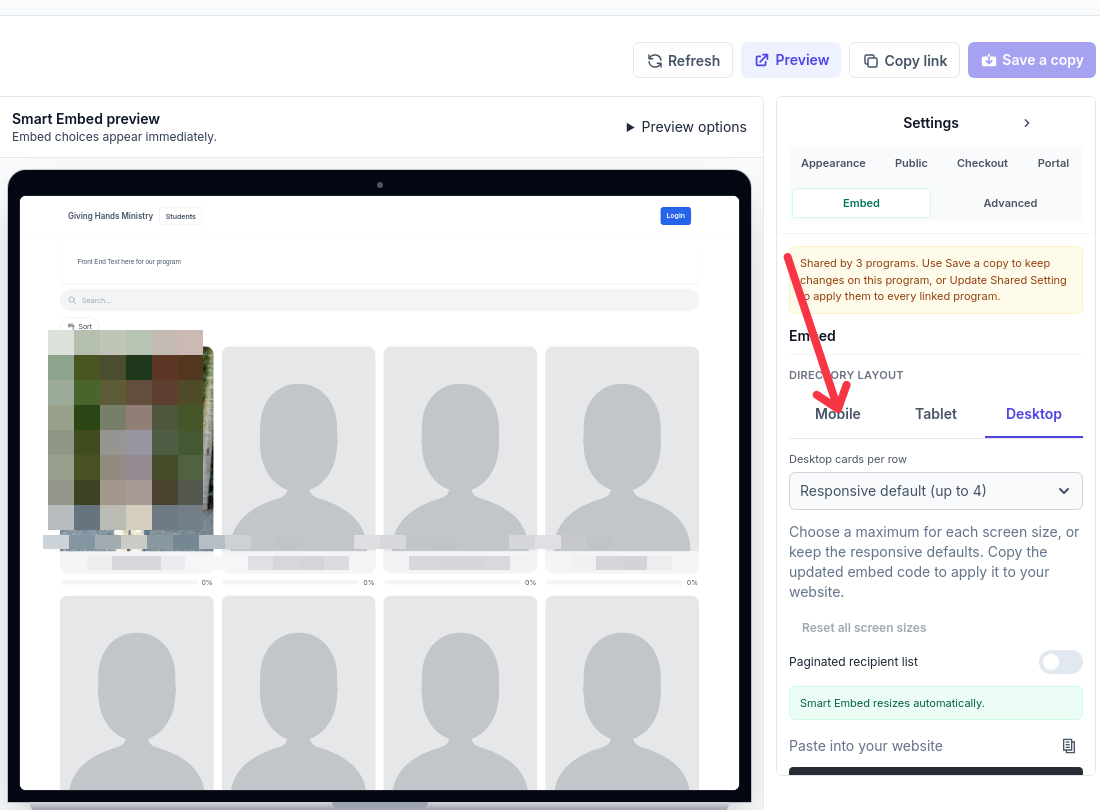
The Directory layout controls sit in the Embed section. Each screen size has its own cards-per-row dropdown, with Responsive default as the starting choice. Recipient details are obscured in these screenshots.
Go to Programs > Recipients and select Manage on your program.
In Website & Embed, open Embed > Directory layout.
Select Mobile, Tablet, or Desktop, then choose the number of cards per row. Switching tabs also changes the preview size.
Repeat for the other screen sizes. Turn on Paginated recipient list if you want donors to browse pages instead of a scrolling list.
Copy the updated code under Paste into your website, replace the existing snippet on your website, and publish that website page.
Screen size | Available columns |
|---|---|
Mobile | 1 or 2 |
Tablet | 1, 2, or 3 |
Desktop | 1, 2, 3, or 4 |
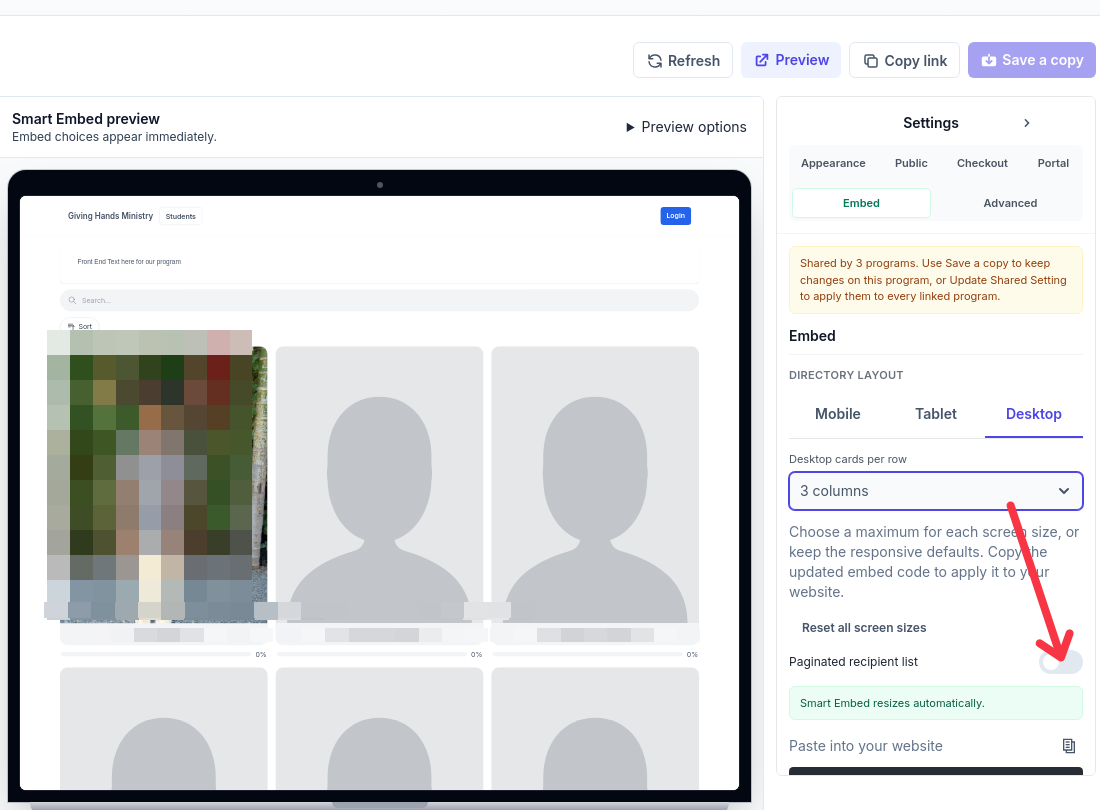
The Paginated recipient list toggle sits below the screen-size settings.
For example, choose 1 column on mobile, 2 on tablet, and 3 on desktop for a layout that becomes wider as more space is available. For a predictable custom layout, set all three screen sizes.
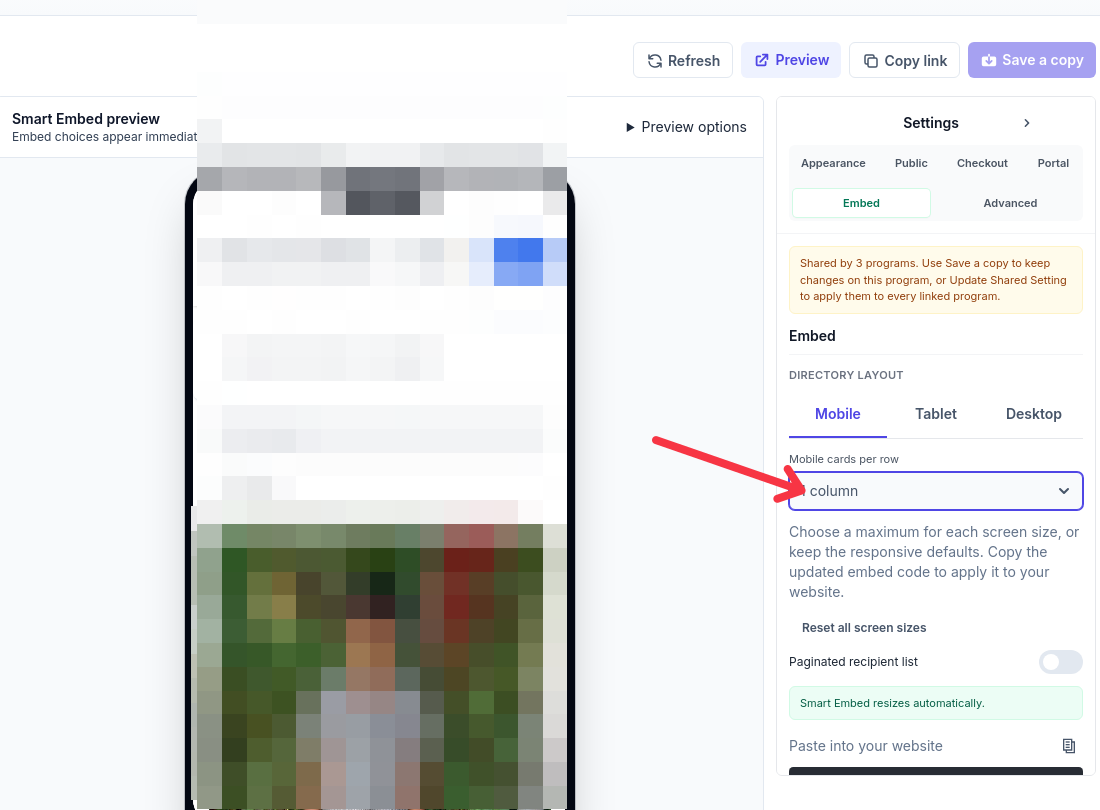
Mobile: 1 card per row.
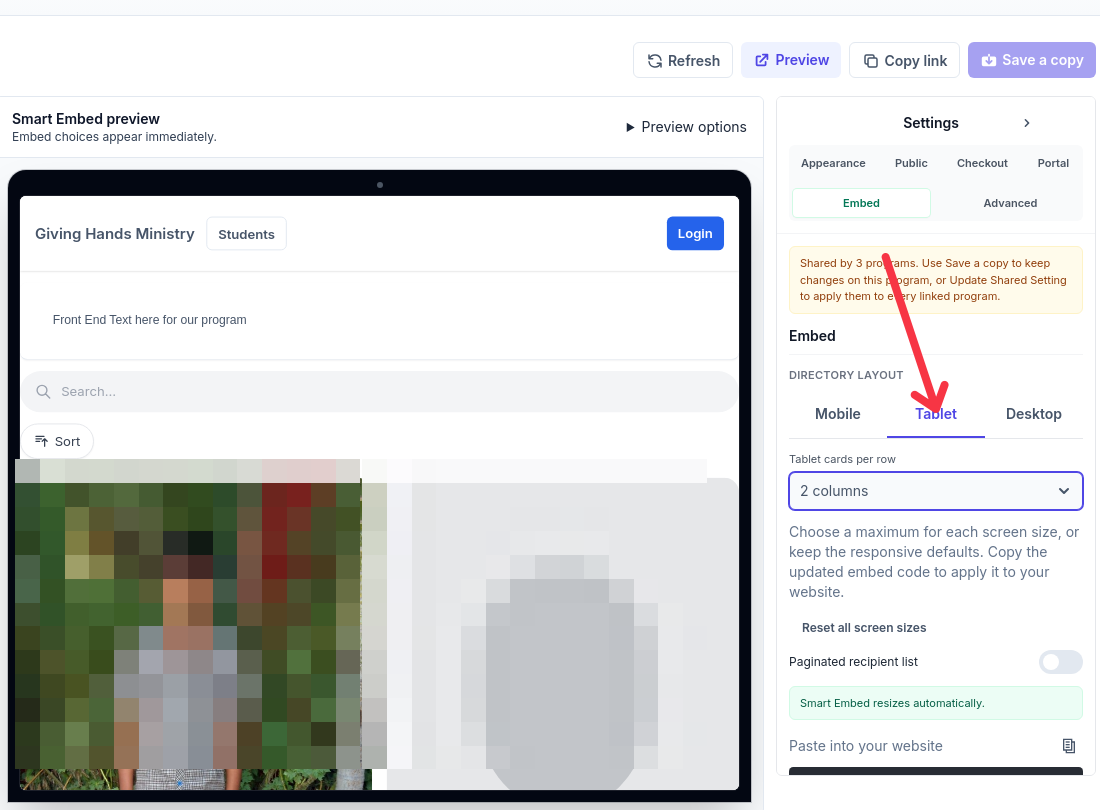
Tablet: 2 cards per row.
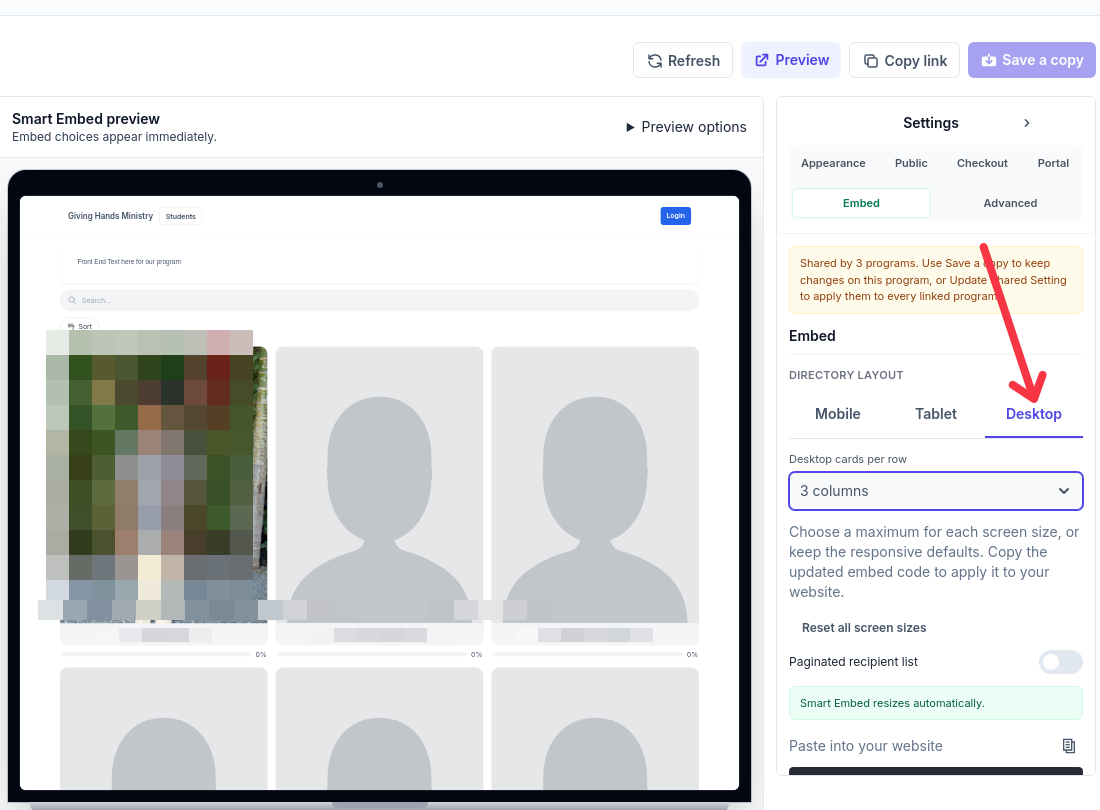
Desktop: 3 cards per row.
Apply the change to your website: Column choices belong to the embed snippet, not the program's saved or shared settings. Changing the preview does not update a snippet already installed on your website. Save a copy and Update Shared Setting do not publish these column choices; copy and replace the embed code instead.
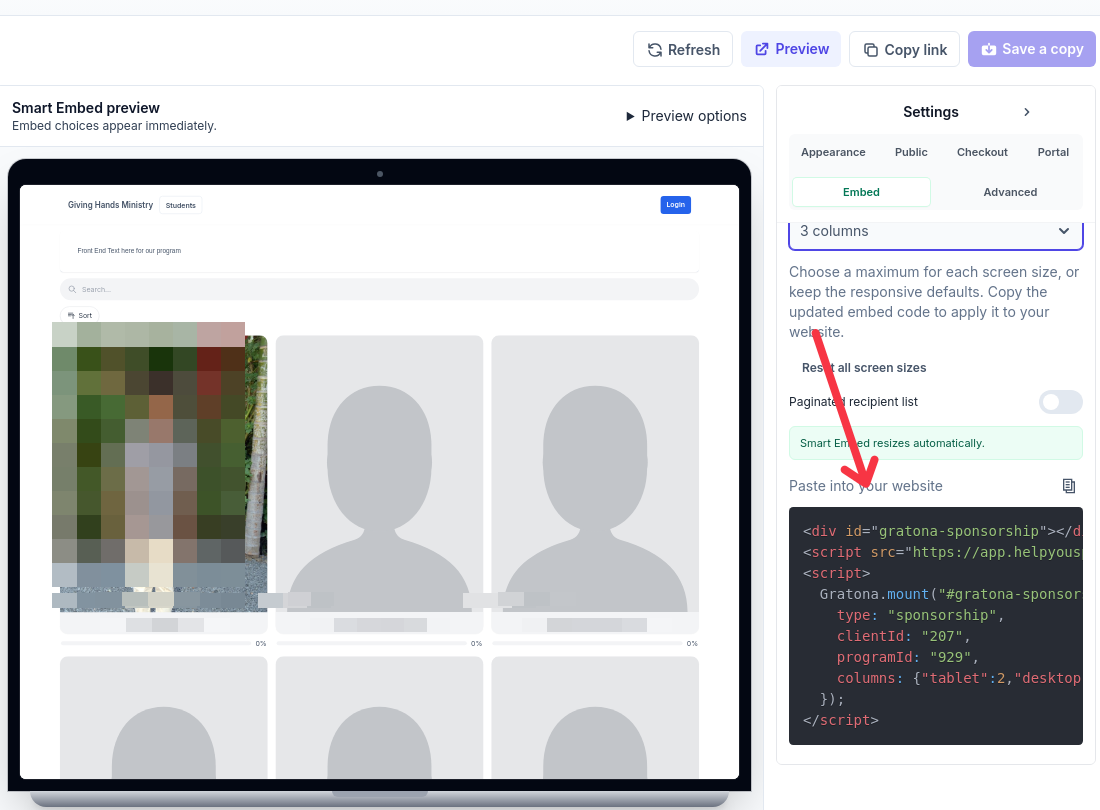
The code can extend beyond the visible panel. Use the copy icon beside Paste into your website to copy the complete snippet after choosing your layout, then replace the old snippet on your website. Use your own program's generated code rather than transcribing this screenshot.
Responsive defaults and existing embeds
Existing embeds and public links without column overrides keep their original responsive layout. You do not need to change them unless you want a custom layout.
Once you customize at least one screen size, sizes left at Responsive default use the Smart Embed defaults: up to 2 columns on mobile, 3 on tablet, and 4 on desktop. To remove all column customization and restore the original responsive layout, select Reset all screen sizes, then copy and replace the code on your website again.
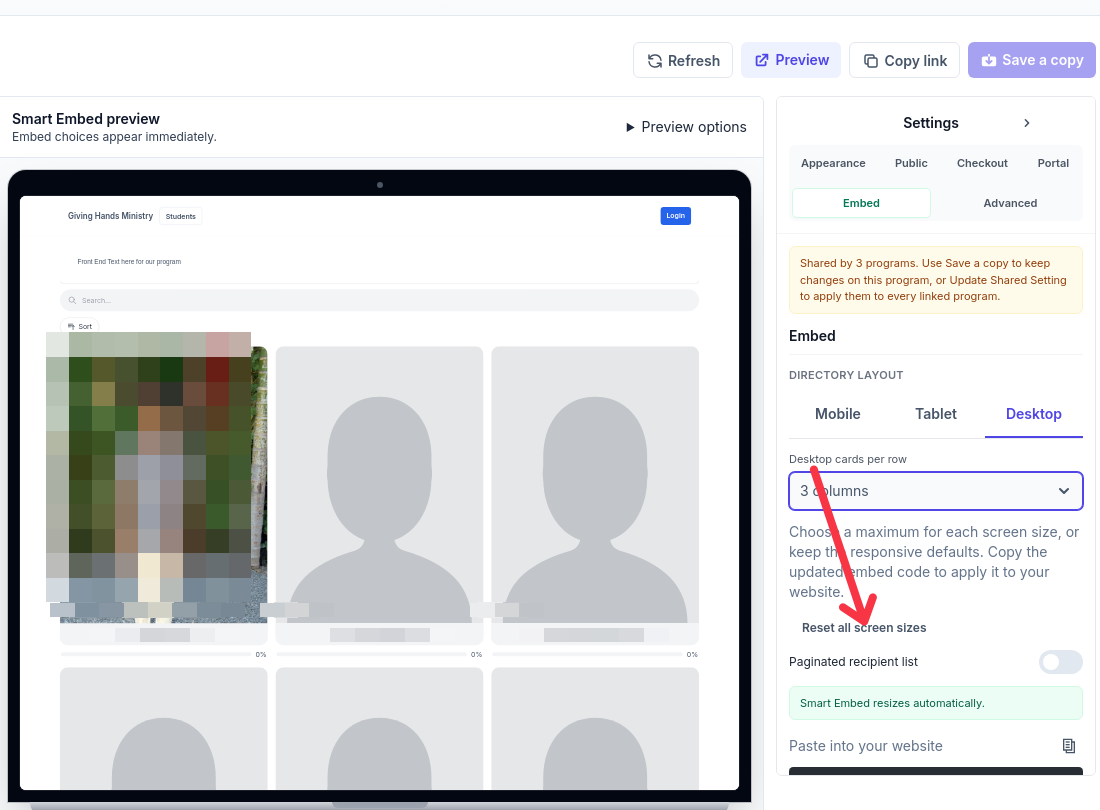
Reset all screen sizes removes every column override.
Check the layout on your website
Preview mobile, tablet, and desktop in the workspace, then check the published page on your own website. The available width inside the embed determines the layout, so an embed placed in a narrow website column can use a smaller-screen layout even on a desktop.
The column counts are maximums, not a promise to fill every row. A single recipient remains centered, and a list with only two recipients does not create a wider three- or four-column grid.
If the website still shows the old layout, confirm that you replaced the existing snippet with the newly copied code and published the website page. Check all three screen-size choices and the width of the website area containing the embed.
Change the theme color
Theme color changes save immediately and apply only to the program you have open. To match colors across several programs, repeat the change in each program's workspace.
In the settings panel, open Appearance.
Under Theme color, choose a palette color, such as Emerald or Blue, and a shade. The change saves as soon as you choose, and the preview updates.
To match a specific brand color, select Custom, choose the color in the color picker, and select Set Custom Theme.
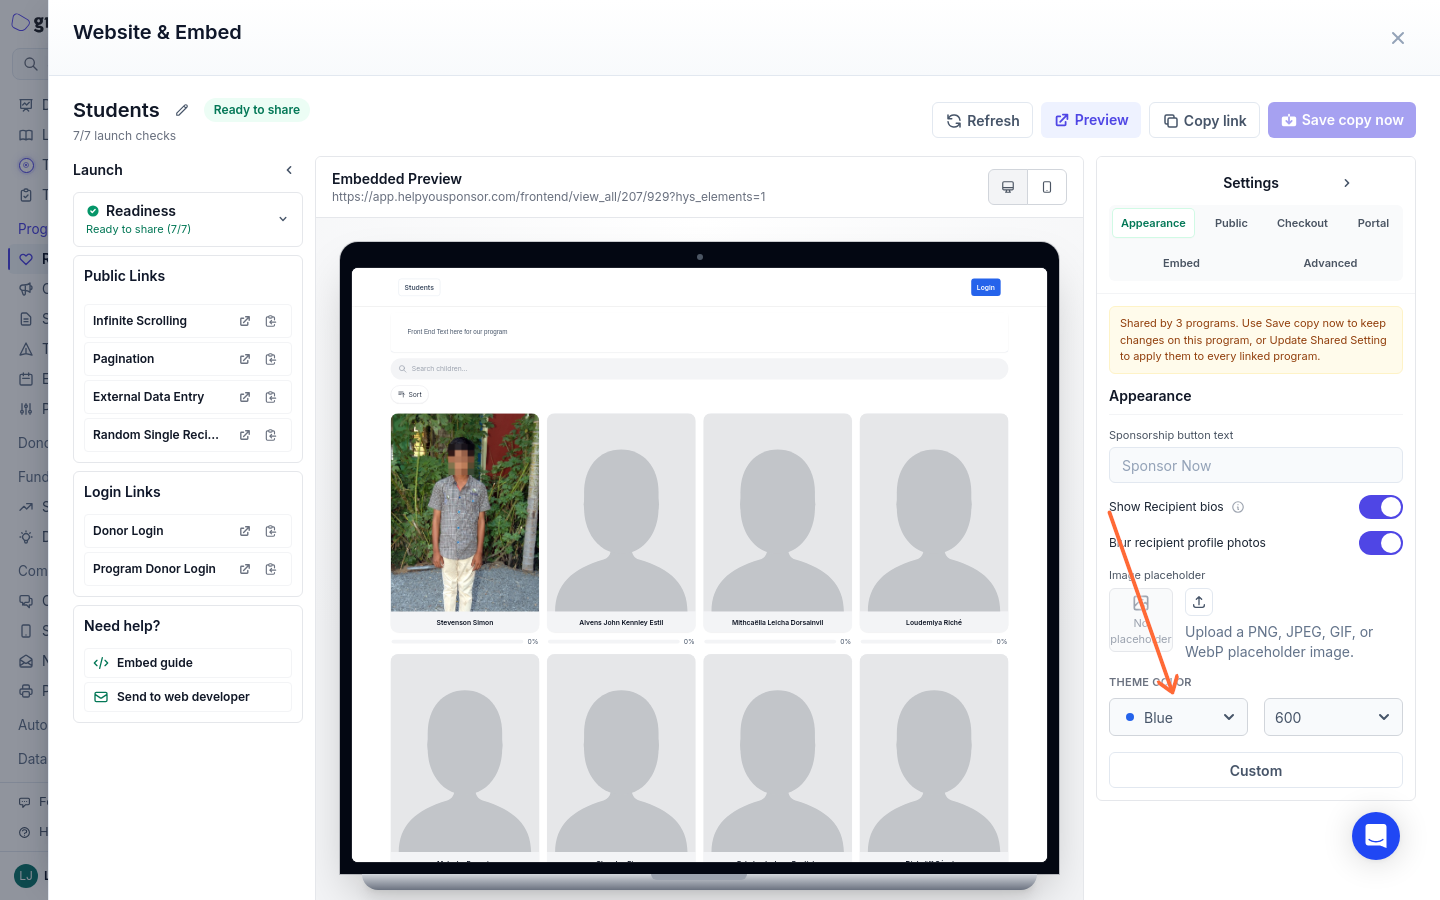
The Appearance section holds the Theme color control alongside button text, recipient bios, and photo privacy.
A custom hex color is saved as the nearest supported palette color, not the exact hex you entered, so the page can render a slightly different shade than your brand color. After changing the color, use Preview to check the listing, a recipient profile, and checkout before sharing the page.
The general Donor Login link uses organization-level branding, so changing one program's theme does not change that login. Use Program Donor Login when the login should use that program's theme.
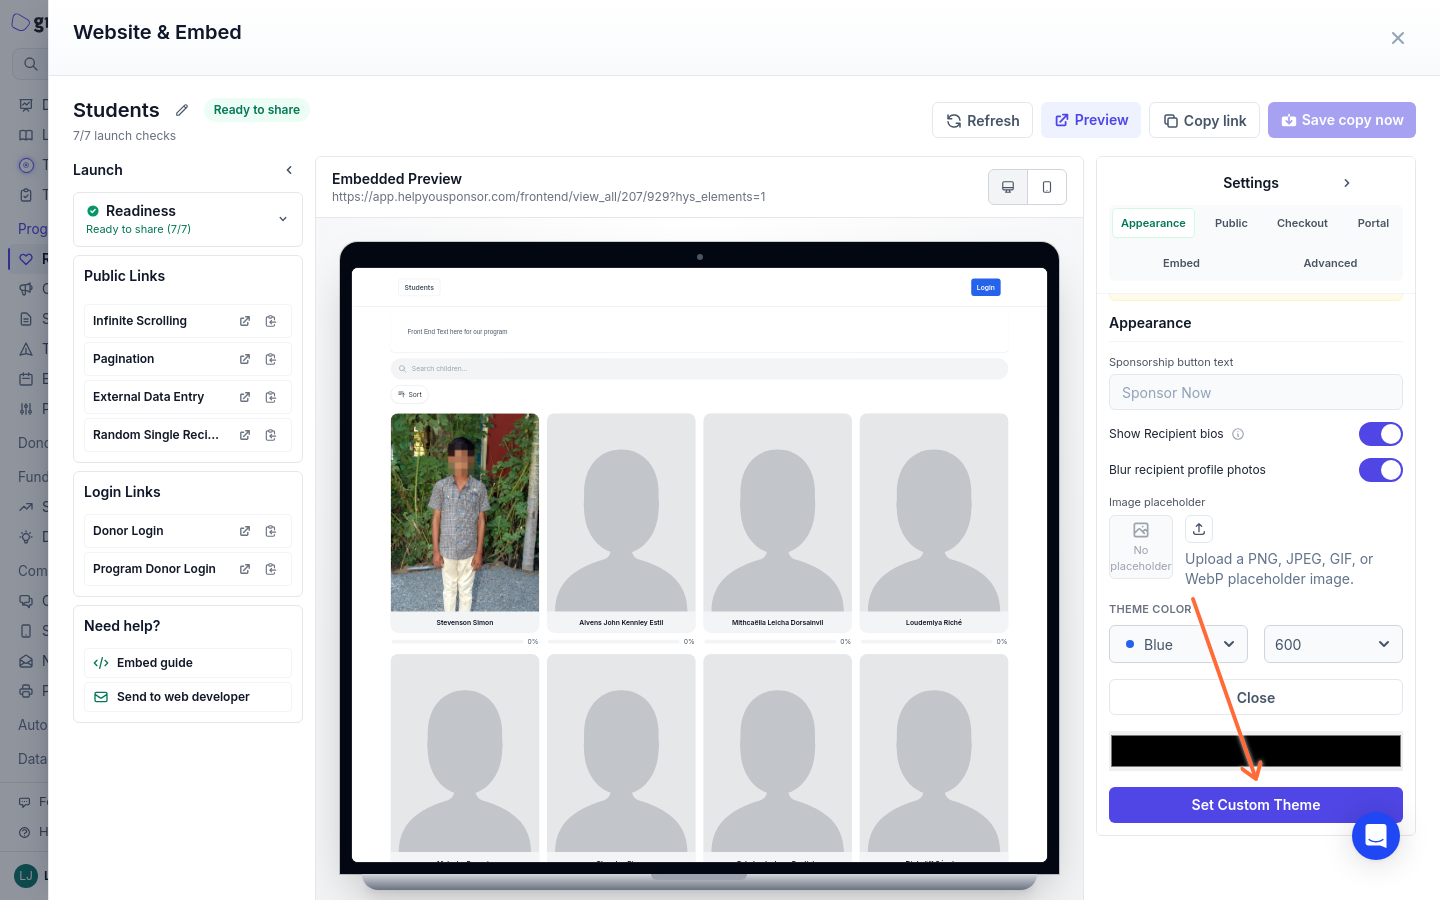
Set Custom Theme saves the nearest palette match for the color you picked.
Control the sponsorship amounts donors can choose
Allow custom sponsorship amounts controls whether donors can enter their own amount on a contribution program's public page. When it is on, donors can choose a configured level or select Other and enter a custom amount. When it is off, the Other option and its custom amount field are hidden, and donors choose from the configured levels or the exact amount needed to finish a partially funded recipient.
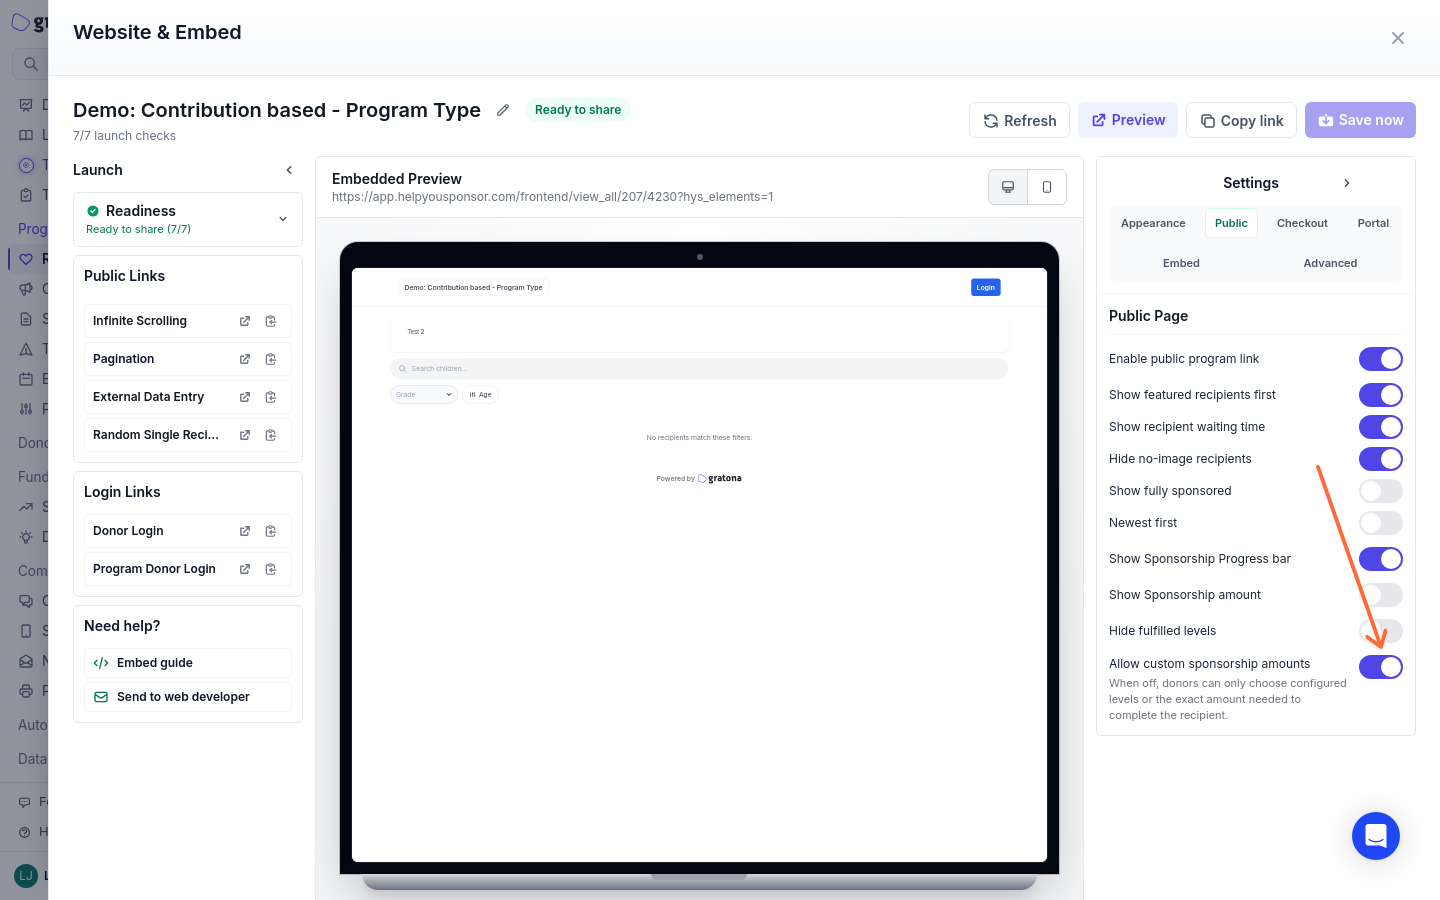
When custom amounts are off, the public page offers the configured levels that still fit the recipient's remaining balance:
If the remaining balance matches a configured level, donors see that level and every smaller configured level.
If the remaining balance does not match a level, donors see a single option labeled Complete sponsorship for the exact remaining balance.
Once a recipient is fully funded, no amount options are shown.
The remaining balance counts committed contributions converted to their monthly equivalent. Because of the exact-balance option, turning custom amounts off does not promise that only the configured levels ever appear.
For example, a recipient with a $60 target and $30 and $60 levels, with custom amounts off:
Already committed | Donor sees |
|---|---|
$0 | $30 and $60 |
$30 | $30 only |
$32.60 | $27.40, labeled Complete sponsorship |
You configure the levels and each recipient's target in Program Settings.
Hide fulfilled contribution levels
Hide fulfilled levels is a separate setting from custom amounts, and its filtering applies when custom amounts are allowed. With a $30 commitment on a $60 target, it can remove the matching $30 level as well as the full $60 target.
When Allow custom sponsorship amounts is off, the remaining-balance rules above take precedence, even if Hide fulfilled levels is off. Turning Hide fulfilled levels on is not a substitute for disabling Other, and it does not implement a below or above 50 percent funded rule.
How completion is calculated for donors
Contribution and Number of Sponsors programs measure completion differently, and donors see the difference on the public page.
Contribution: completion is the committed amount as a percentage of the recipient's target amount. The page shows a progress bar and how much remains toward the target.
Number of Sponsors: completion is the number of committed sponsors as a percentage of the recipient's required sponsor slots. The page shows how many sponsors have committed and how many more are needed.
Both types show a progress bar when progress display is enabled for the program. You choose the completion type in the program's setting profile in Program Settings.
Let donors sort the recipient list
Donors can sort the recipient list with a sort menu when two things are true: Allow users to sort on front page is enabled in the program's setting profile, and the fields are marked sortable on the recipient form attached to the program. Donors choose the field and direction, with choices such as Age (A→Z), Age (Z→A), Grade (A→Z), and Grade (Z→A).
Enable donor sorting in Front Page Options
The setting lives in Front Page Options, part of the program's setting profile in Program Settings. You need a role that can manage program settings, and the change applies to every program attached to that profile.
Open Program Setup > Program Settings and edit the setting profile the program uses.
In Front Page Options, check Allow users to sort on front page.
Select Save.
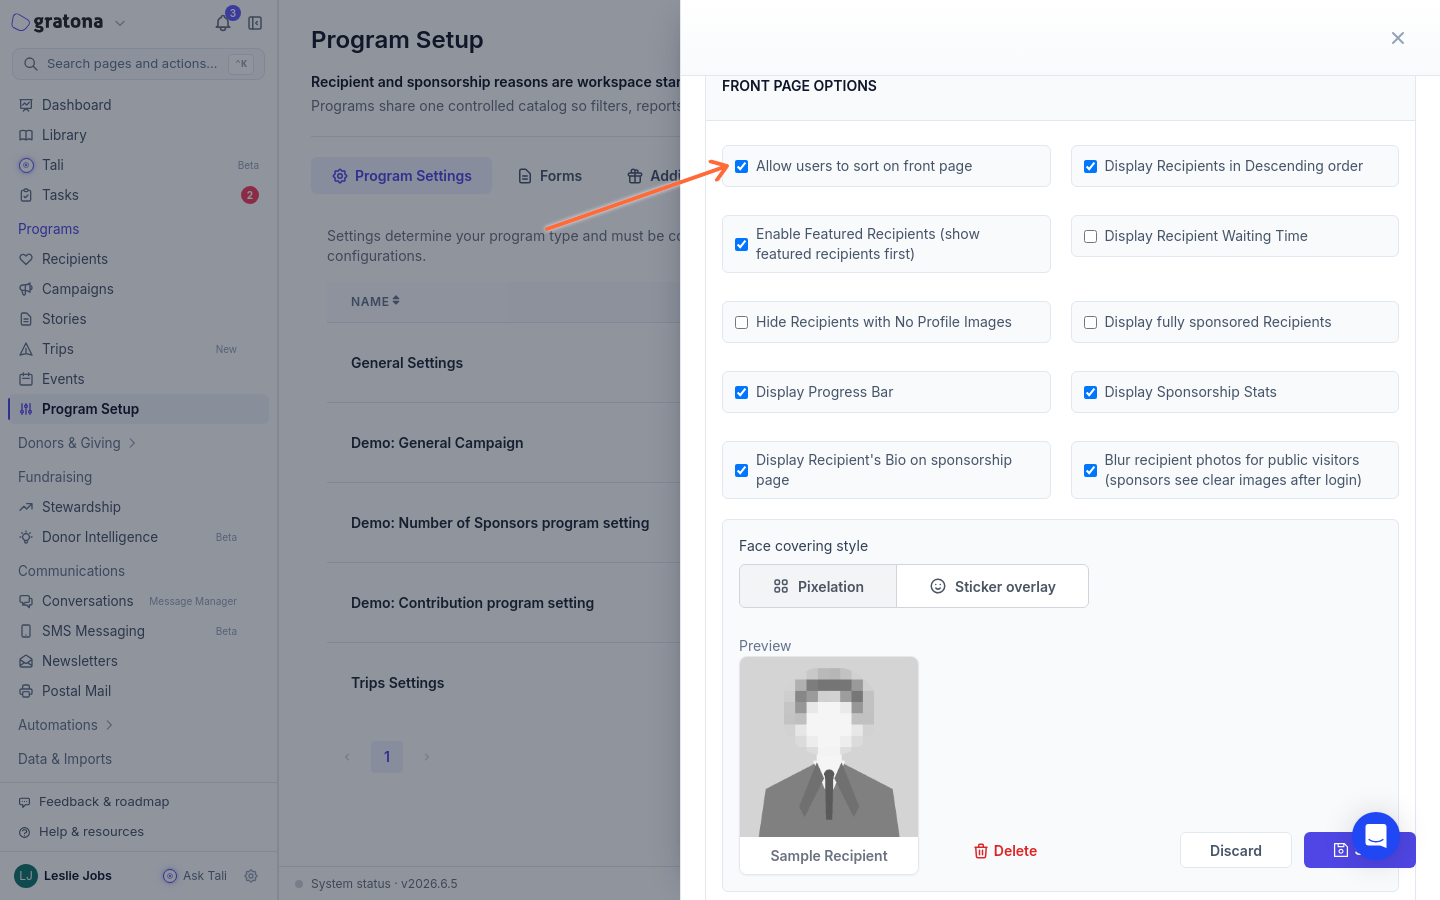
Make Age or Grade sortable on the recipient form
The sort menu is built from the recipient form attached to the program, and a field only appears in it when donors are allowed to see the field. See Program Forms for the full form tools.
Open Program Setup > Forms.
Find the recipient form attached to the program and select Manage Form.
Edit the Age or Grade field.
Check Sortable? and save the field.
A field must be visible to Everyone to appear in the public sort menu. Fields set to donor and admins or admins only are left out, and donors who pick an unavailable sort see the message The selected sort field is not available publicly.
Only set fields to Everyone when that is appropriate. Do not expose private recipient information just to enable sorting.
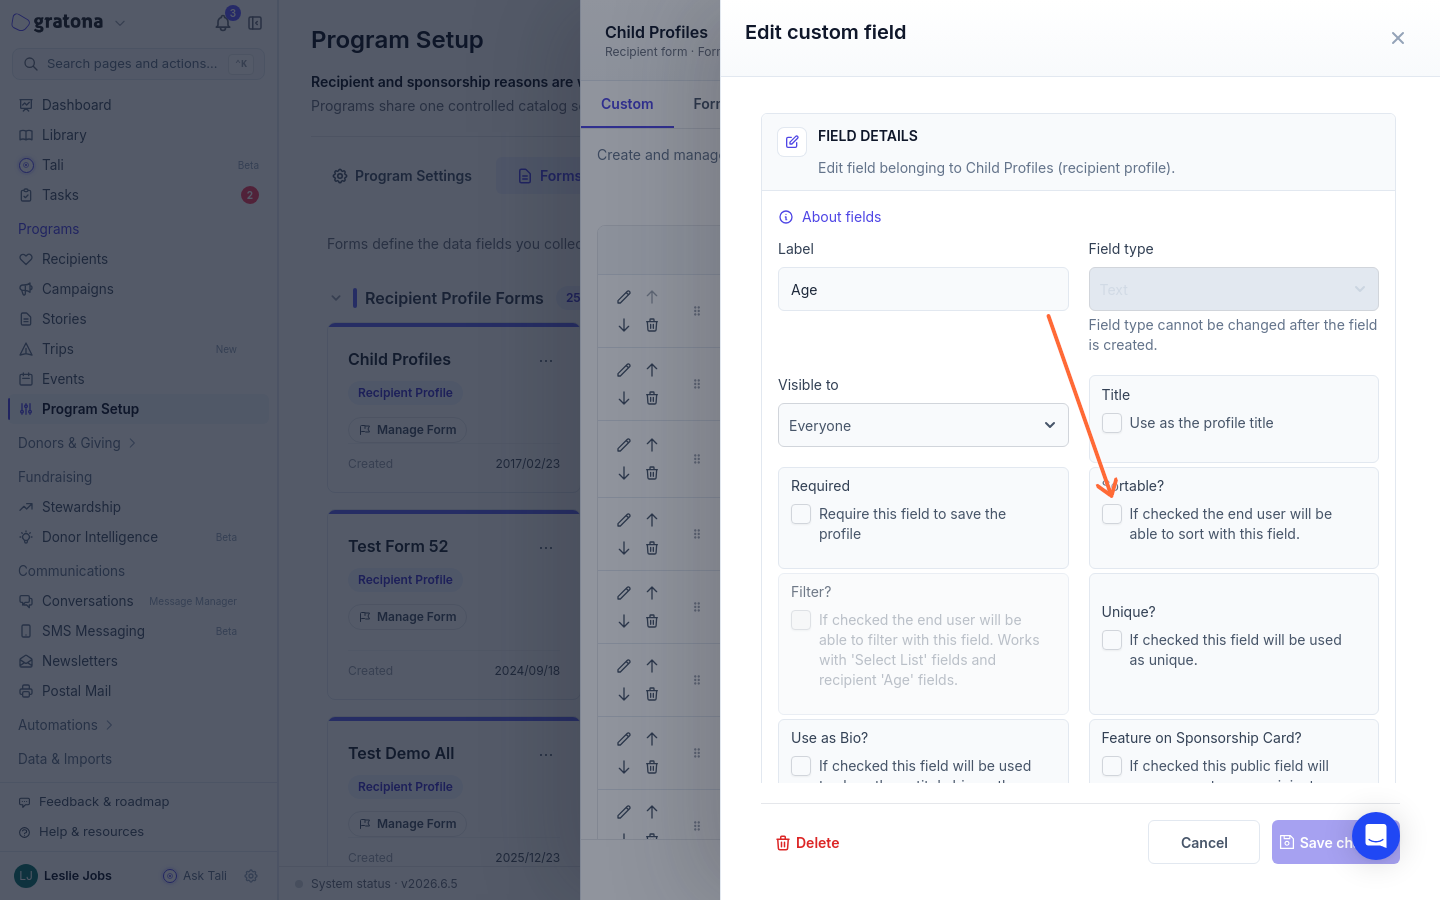
Sortable? and Filter? are separate settings
Filter? controls donor filtering and works with Select List fields and recipient Age fields; it never adds a field to the sort menu. Sortable? controls sorting only. Unchecking Sortable? on a field, such as Religion, removes it from the sort choices without deleting the field from the form.
On the public listing, click Sort for Age or Grade ordering. A separate Gender dropdown filters the list; it is not the sort menu. An Age filter must be enabled separately. A Grade field stored as Text can be sortable without appearing as a filter dropdown; filter dropdowns use Select List fields. An existing field’s type cannot be changed. If you need a Grade dropdown, create a Select List field and plan how to transfer the existing grade values before replacing the old field; contact support if you need help.
Default order and featured recipients
When no sort option is selected, recipients are ordered oldest to newest by the date they were added. Enable Display Recipients in Descending order in the same Front Page Options section to show the newest first instead. Featured recipients appear before the rest of the list when featured recipients are enabled, and they stay ahead of the list even when a donor chooses a sort.
This is donor-selected sorting: Gratona does not automatically order the list by least percentage funded, and no setting provides that ordering.
Shared profiles and shared forms
Front Page Options belongs to the setting profile, so enabling sorting there changes every program attached to that profile. If several programs share the same recipient form, changing Sortable? on that form affects all of the linked programs. On a public listing that combines several programs, a field appears in the sort menu only when it is public and sortable on every form involved.
Troubleshoot a missing Age or Grade
A sort choice disappeared after a form change
Unchecking Sortable?, changing the field's visibility away from Everyone, or removing the field from the form removes that choice from the sort menu. Check Sortable? and set the visibility back to Everyone to restore it. If several programs share the recipient form, the change affected every linked program at once.
Remove Gratona branding
Removing Gratona branding from public pages is available on Scale and above, and on custom contracts that include it. The control is not in the Website & Embed settings panel: it is currently shown for Campaign, Peer-to-Peer, and Trips programs, in the Settings Editor. If your account is eligible but the control is missing or disabled, contact support.
In Website & Embed, expand the Advanced section and select Open Settings Editor.
In Donation Page Options, select Remove branding and save the setting.
The Remove branding control is not currently shown for contribution or fixed-slot sponsorship programs.
Preview the donor experience
The center of the workspace shows an embedded preview of the public page. Expand Preview options and use the desktop, tablet, and mobile buttons to check different screen sizes. For sponsorship directories, the Mobile, Tablet, and Desktop tabs in Embed > Directory layout also switch the preview size.
Use Refresh after saving settings or changing setup details if you want the preview to reload.
Adjust what donors see
The settings panel is organized by what you are trying to control:
Appearance: button text, recipient bios, photo privacy, image placeholder, and theme color.
Public: public page visibility, featured recipients, waiting time, fully sponsored recipients, recipient order, progress, sponsorship amounts, and fulfilled contribution levels.
Checkout: default amount, default frequency, recurring donations, payment methods, processing fee options, additional gifts, in-honor-of field, and sponsorship start date.
Portal: donor login on checkout, recipient portal, recipient portal visibility, recipient profile actions, and recipient-to-donor messaging.
Embed: Smart Embed code, recipient directory columns by screen size, pagination, and other supported embed defaults.
Advanced: program setup, forms, emails, SMS, and the full settings editor.
If your role can preview but cannot manage settings, the settings panel is read-only. You can still copy links and embed code.
Save changes safely
Some program settings are shared across multiple programs. When a setting is shared, Gratona shows a shared-setting notice in the workspace.
If you want the change to apply only to the current program, use Save a copy. Gratona creates a program-specific copy of the setting and leaves the other linked programs unchanged.
If you want the change to apply to every linked program, use Update Shared Setting from the Advanced section. Gratona asks you to confirm the shared update and shows a summary of the changes before saving.
If no website settings have changed, the save actions stay disabled. Directory column choices are applied through the copied embed code, not these save actions; see Choose recipient columns by screen size above.
Related guides
Was this helpful?
Was this helpful?